# Xizor — Full documentation
> Xizor is the AI-native subscription platform for mobile apps: a native StoreKit 2 payment SDK (Swift + Expo/React Native), server-hosted paywalls authored as web code that go live on save, complete subscription analytics, and a built-in MCP server so AI agents can read every stat and edit every paywall.
This file concatenates every page of https://xizor.dev/docs for LLM consumption.
---
# Overview
URL: https://xizor.dev/docs
Xizor is the AI-native subscription platform for mobile apps. It gives you four things that normally require four different products:
- **Native StoreKit 2 payments** — XizorKit (Swift) and @xizor/expo (React Native) handle purchases, restores, and server-side receipt verification. Entitlements are always computed on the server from cryptographically verified transactions.
- **Server-hosted paywalls, authored as web code** — paywalls are self-contained web documents edited in the dashboard (or by an AI agent) and served to the SDKs as a page rendered in a WebView, with StoreKit and analytics staying native via a bridge. Publishing a change makes it live at the very next presentation, without an app update.
- **Complete subscription analytics** — MRR, revenue, churn, trial conversion, LTV, ARPU, cohort retention, and per-paywall funnels, computed from App Store Server Notifications and verified transactions.
- **A built-in MCP server** — connect Claude, ChatGPT, or Gemini with OAuth 2.1 and your agent can read every stat and _write_: draft, localize, and publish paywalls from a chat prompt.
## How it fits together
```text
┌────────────────────────┐ ┌───────────────────────────────┐
│ Your app │ │ App Store │
│ XizorKit (Swift) │ │ Server Notifications V2 │
│ @xizor/expo (RN) │ └──────────────┬────────────────┘
└──────────┬─────────────┘ │ signed JWS
│ identify / transactions / │
│ entitlements / paywall / events │
▼ ▼
┌──────────────────────────────────────────────────────────────┐
│ api.xizor.dev — verification, entitlements, paywall delivery │
└──────────┬───────────────────────────────────┬───────────────┘
│ │ webhooks (HMAC-signed)
▼ ▼
┌─────────────────────────┐ ┌────────────────────────┐
│ Xizor platform │ │ Your server (optional) │
│ dashboard.xizor.dev │ └────────────────────────┘
│ mcp.xizor.dev (agents) │
└─────────────────────────┘
```
Your app talks to `api.xizor.dev` with a publishable API key. Apple talks to the same API via App Store Server Notifications V2, so renewals, refunds, and billing issues keep your data current even while the app is closed. The dashboard and the MCP server sit on top of the same data — what your agent sees is exactly what you see.
## Where to go next
| Guide | What you get |
| ----------------------------------------------------------------------- | -------------------------------------------------------------------------- |
| [iOS quickstart](https://xizor.dev/docs/quickstart-ios) | XizorKit installed, purchases and paywalls working in SwiftUI |
| [Expo quickstart](https://xizor.dev/docs/quickstart-expo) | @xizor/expo with provider, hooks, and the WebView paywall renderer |
| [Migrate from Superwall](https://xizor.dev/docs/migrate-from-superwall) | Concept mapping, automatic subscriber migration, and the cutover checklist |
| [Apple setup](https://xizor.dev/docs/apple-setup) | App Store Connect key + Server Notifications wired to Xizor |
| [Paywalls](https://xizor.dev/docs/paywalls) | Placements, versions, save-to-live, and the full document schema |
| [Analytics](https://xizor.dev/docs/analytics) | Exact definitions behind every metric |
| [MCP server](https://xizor.dev/docs/mcp) | Your subscription business inside Claude, ChatGPT, or Gemini |
| [REST API](https://xizor.dev/docs/api) | The full api.xizor.dev reference and webhook verification |
| [For coding agents](https://xizor.dev/docs/for-agents) | A copy-paste prompt that integrates Xizor into an app |
## The five-minute version
1. Sign up at [dashboard.xizor.dev](https://dashboard.xizor.dev) and create an app — you get a publishable API key (`xz_pub_…`).
2. Complete the [Apple setup](https://xizor.dev/docs/apple-setup): In-App Purchase key + Server Notifications URL.
3. Install a SDK and call `configure` with your key ([iOS](https://xizor.dev/docs/quickstart-ios) / [Expo](https://xizor.dev/docs/quickstart-expo)).
4. Create a paywall in the dashboard, assign it to a placement (e.g. `onboarding`), and present it from the SDK.
5. Optionally [connect your AI agent](https://xizor.dev/docs/mcp) — and let it run your paywall experiments.
Machine-readable indexes of these docs live at [/llms.txt](https://xizor.dev/llms.txt) and [/llms-full.txt](https://xizor.dev/llms-full.txt).
---
# iOS quickstart (XizorKit)
URL: https://xizor.dev/docs/quickstart-ios
XizorKit is the native Swift SDK: StoreKit 2 purchases, server-verified entitlements, and server-hosted paywalls — each paywall is served as a self-contained web page that the SDK renders in a `WKWebView` (presented from SwiftUI or UIKit), while purchases, restore, and analytics stay native via a bridge. It supports iOS 17+, macOS 14+, tvOS 17+, watchOS 10+, and visionOS 1+, and is built with strict concurrency.
## Install
XizorKit currently lives inside the Xizor monorepo at [github.com/valewnrt/xizor](https://github.com/valewnrt/xizor), in the `sdks/swift` directory (a dedicated `xizor-swift` repository with tagged releases is planned — this page will be updated when it ships). Because Swift Package Manager resolves URL dependencies from a repository root, add it as a **local package** for now:
1. Clone the repository: `git clone https://github.com/valewnrt/xizor.git`
2. In Xcode: **File → Add Package Dependencies… → Add Local…** and select the `sdks/swift` folder (it contains `Package.swift` for the `XizorKit` library).
3. Add the `XizorKit` product to your app target.
Alternatively, reference it from another `Package.swift` via `.package(path: "../xizor/sdks/swift")`.
## Configure
Call `Xizor.configure(apiKey:)` once, as early as possible — your publishable key (`xz_pub_…`) is in the dashboard under your app's settings and is safe to embed in the app:
```swift
import SwiftUI
import XizorKit
@main
struct MyApp: App {
init() {
Xizor.configure(apiKey: "xz_pub_XXXXXXXXXXXXXXXXXXXXXXXXXXXXXXXX")
}
var body: some Scene {
WindowGroup { ContentView() }
}
}
```
`configure` accepts optional parameters:
| Parameter | Default | Purpose |
| ----------------------- | ----------------------- | ------------------------------------------------------------------------------------------------------------------------------ |
| `apiBaseURL` | `https://api.xizor.dev` | Override for testing |
| `logLevel` | `.warn` | `XizorLogLevel` verbosity |
| `salvageDelay` | `2500 ms` | Wait before double-checking a reported purchase cancel (StoreKit sometimes mis-reports) |
| `legacyAppAccountToken` | `nil` | Async provider of an existing appAccountToken when [migrating](https://xizor.dev/docs/migrate-from-superwall) from another SDK |
On configure, the SDK starts observing StoreKit transaction updates (renewals, refunds, Ask to Buy) and performs an initial entitlement sync. The published `currentEntitlements` property makes the whole SDK usable as a SwiftUI `ObservableObject`.
## Identify users and the appAccountToken
Xizor identifies each install with an **appAccountToken** — a UUID generated on-device, persisted across launches, and attached to every StoreKit purchase as `Transaction.appAccountToken`. Because Apple embeds it in the signed transaction, it cryptographically ties App Store purchases (and every later server notification: renewals, refunds, billing retry…) back to the right subscriber, even across reinstalls and restores. The SDK registers it with the backend on launch (`identify()`); you never manage it yourself.
Anonymous users work out of the box. To attach your own user id after login, hand the token to your backend and call `POST /v1/subscribers/alias` there with your **secret** key — existing subscriber histories merge automatically ([details](https://xizor.dev/docs/api)):
```swift
// After login — bind this install to "user_42" via your backend:
let token = await Xizor.shared.appAccountToken
try await myAPI.linkSubscriber(token: token, userID: "user_42")
// backend: POST https://api.xizor.dev/v1/subscribers/alias (secret key)
```
## Purchases and entitlements
```swift
// Purchase — verification and entitlement computation happen server-side.
let result = try await Xizor.shared.purchase(productID: "com.example.pro.yearly")
switch result {
case .success(let entitlements): print("unlocked:", entitlements)
case .cancelled: break // user backed out — not an error
case .pending: break // e.g. Ask to Buy — entitlement arrives later
}
// Gate features:
if Xizor.shared.hasEntitlement("pro") { unlockPro() }
// Fetch fresh entitlements from the backend:
let entitlements = try await Xizor.shared.entitlements()
// Restore:
try await Xizor.shared.restorePurchases()
```
In SwiftUI, observe `currentEntitlements` directly:
```swift
struct ProGate: View {
@ObservedObject var xizor = Xizor.shared
var body: some View {
if xizor.currentEntitlements.contains(where: { $0.identifier == "pro" && $0.isActive }) {
ProContent()
} else {
LockedContent()
}
}
}
```
Each `XizorEntitlement` carries `identifier`, `isActive`, `productId`, `expiresAt`, `willRenew`, `isTrial`, and `state` (`subscribed`, `expired`, `in_grace_period`, `in_billing_retry`, `revoked`, `paused`). Only `subscribed` and `in_grace_period` are active.
The SDK sends the signed StoreKit 2 transaction (`jwsRepresentation`) to `POST /v1/transactions`, where the signature chain is verified against Apple's root certificates — entitlements are never computed on-device.
## Present a paywall
Paywalls are fetched by **placement** (e.g. `"onboarding"`) — the dashboard decides which paywall a placement shows. Two ways to present:
**Imperative** (UIKit presentation, awaits the outcome):
```swift
let result = await Xizor.shared.presentPaywall(placement: "onboarding")
if case .purchased = result { unlockPro() }
```
**SwiftUI** with `XizorPaywallView` — a self-loading paywall view for `fullScreenCover` or `sheet`:
```swift
.fullScreenCover(isPresented: $showPaywall) {
XizorPaywallView(placement: "onboarding") { result in
if case .purchased = result { unlockPro() }
showPaywall = false
}
}
```
Both return/report a `XizorPaywallResult`: `.purchased(entitlements:)`, `.restored(entitlements:)`, or `.dismissed`. Purchase buttons, restore, dismiss, product selection, and funnel events (`paywall_view`, `purchase_started`, `purchase_completed`, `paywall_dismiss`…) are all handled by the renderer automatically.
Paywall documents can trigger `custom` actions (e.g. "continue with limited version"). Handle them via the closure or a delegate:
```swift
XizorPaywallView(placement: "onboarding", onCustomAction: { name, payload in
if name == "skip" { showPaywall = false }
})
// …or globally:
Xizor.shared.paywallDelegate = self // XizorPaywallDelegate
```
You can also pass `customVariables:` to fill `{{custom.*}}` placeholders in paywall text. Product variables (`{{product.price}}`, `{{trial.days}}`, …) are filled from StoreKit automatically.
Paywall fetches are ETag-cached: the SDK revalidates on every presentation, so an edit published in the dashboard (or by your AI agent) is live at the very next presentation — no app update, no waiting.
## Track custom events
```swift
Xizor.shared.track("onboarding_finished", properties: ["step": .int(4)])
```
Events appear in the dashboard and feed the [analytics](https://xizor.dev/docs/analytics) and paywall funnels.
## Next steps
- [Apple setup](https://xizor.dev/docs/apple-setup) — required for server notifications and sandbox testing.
- [Paywalls](https://xizor.dev/docs/paywalls) — placements, versions, and the document schema.
- [MCP server](https://xizor.dev/docs/mcp) — let your agent edit the paywalls you just wired up.
---
# Expo quickstart (@xizor/expo)
URL: https://xizor.dev/docs/quickstart-expo
`@xizor/expo` is the Xizor SDK for React Native / Expo: StoreKit 2 purchases via [expo-iap](https://github.com/hyodotdev/expo-iap) and a server-driven paywall renderer — the server-hosted paywall is served as a self-contained web page that the SDK loads into a WebView (react-native-webview), while StoreKit purchases and analytics stay native through a bridge.
Requirements: Expo SDK 57+, React Native 0.86+, React 19 (New Architecture). iOS first — Android purchase paths throw a clear `platform_not_supported` error until Play Billing lands.
## Install
```sh
npx expo install expo-iap react-native-webview expo-web-browser \
expo-secure-store expo-haptics
pnpm add @xizor/expo # or npm/yarn
```
All of the above are **peer dependencies** — `npx expo install` picks the versions matching your Expo SDK. `expo-iap` (StoreKit 2), `react-native-webview` (the paywall renderer), and `expo-web-browser` (in-app browser for paywall links) are required; `expo-secure-store` (or `@react-native-async-storage/async-storage`) persists the subscriber token, and `expo-haptics` powers paywall haptic feedback — both optional but recommended.
## You need a development build (no Expo Go)
In-app purchases require native StoreKit code that is not part of Expo Go. Build a development client instead:
```sh
npx expo run:ios # local dev build
# or with EAS:
eas build --profile development --platform ios
```
Everything else about your workflow stays the same — fast refresh, Expo Router, etc. Only the container changes.
## Provider and hooks
Wrap your app in `XizorProvider` with your publishable API key (`xz_pub_…`, from the dashboard, safe to embed):
```tsx
import { XizorProvider, useEntitlements, usePaywall } from "@xizor/expo";
export default function App() {
return (
);
}
function Main() {
const { isPro, loading } = useEntitlements(); // isPro = hasEntitlement("pro")
const paywall = usePaywall("onboarding");
if (loading) return paywall.present({ context: { source: "home" } })}
/>
);
}
return }}` variables, and event properties.
The SDK is anonymous by design: it uses an on-device-generated subscriber token (registered with the backend at launch), persisted via `expo-secure-store` (or AsyncStorage — install one of them; without either the token lives only for the JS runtime). To attach your own user id after login, send `await client.getAppAccountToken()` to your backend and call `POST /v1/subscribers/alias` there with your secret key — existing subscriber histories merge automatically ([details](https://xizor.dev/docs/api)).
On startup the provider also reconciles store transactions with the backend once per cold start — existing subscribers (e.g. migrating from another provider) get their entitlements without any import step.
## Imperative client
Outside React (or for full control), use `XizorClient`:
```ts
import { XizorClient } from "@xizor/expo";
const xizor = XizorClient.configure({ apiKey: "xz_pub_…" });
await xizor.identify(); // POST /v1/identify
const entitlements = await xizor.getEntitlements();
const result = await xizor.purchase("com.app.pro.yearly"); // StoreKit 2 via expo-iap
// With a promotional offer (signed server-side; a signature failure aborts —
// never a silent full-price charge):
await xizor.purchase("com.app.pro.yearly", { offerId: "referral_yearly" });
await xizor.restore();
xizor.trackEvent("onboarding_finished", { step: 4 });
const paywall = await xizor.getPaywall("onboarding", {
context: { wasReferred: true }, // optional — placement rules
}); // ETag-cached
const token = await xizor.getAppAccountToken(); // for /v1/subscribers/alias
```
Purchases attach the `appAccountToken` (generated on-device, registered via `/v1/identify`) to the StoreKit transaction and ship the signed JWS to `POST /v1/transactions` for server-side verification — entitlements are always computed server-side.
## Presenting paywalls
Two levels, from most to least convenient:
```tsx
// 1. Hook (provider-hosted modal) — recommended
const { present } = usePaywall("upsell");
// 2. Component — self-contained modal, controlled via `visible`
setShowPaywall(false)}
onDismiss={() => setShowPaywall(false)}
/>;
```
Both render the server-delivered, self-contained paywall page in a `react-native-webview`, with everything money-related staying native via the bridge:
- **Native purchase path** — `purchase`/`restore` taps in the page call back into expo-iap over the bridge; the WebView never handles payment. Navigation inside the WebView is locked down (no foreign URLs), and `open_url` links open in the system or in-app browser (`expo-web-browser`; override with `onOpenUrl`).
- **Media is strictly lazy** — only the visible pager/carousel page plays or decodes video and Lottie; neighbors prefetch at most metadata, everything else stays cold.
- **Product variables** — `{{product.price}}`, `{{product.pricePerMonth}}`, `{{trial.days}}`, … are filled from expo-iap product metadata and injected into the page (pass `productVariables` with a prebuilt `html` page to override, e.g. in previews).
- **Offline pages** — `` properties.
Custom events: `xizor.trackEvent(name, properties)`. Events are batched and flushed every 5 s (or at 50 events); `xizor.flushEvents()` forces a flush.
## Notes & current limitations
- **iOS first**: `purchase()`/`restore()` throw `platform_not_supported` on Android for now.
- **Token persistence**: install `expo-secure-store` (recommended) or `@react-native-async-storage/async-storage` so the subscriber token survives app restarts; a custom adapter can be passed as `storage` to `configure`.
- **False-cancel salvage**: StoreKit occasionally reports `userCancelled` for purchases that completed. After a cancel the SDK waits 2.5 s (`salvageDelayMs`), silently checks the store, and converts the result to a success when the transaction exists.
- `open_url` actions with `inApp: true` open in the in-app browser (`expo-web-browser`); pass `onOpenUrl` to handle them yourself.
## Next steps
- [Apple setup](https://xizor.dev/docs/apple-setup) — server notifications and sandbox testers.
- [Paywalls](https://xizor.dev/docs/paywalls) — the document schema your paywalls are made of.
- [Analytics](https://xizor.dev/docs/analytics) — what the funnel events feed into.
---
# Migrate from Superwall
URL: https://xizor.dev/docs/migrate-from-superwall
Xizor covers the Superwall feature set most subscription apps actually use — placements, remote paywalls, context-based routing, discounts, analytics — with two significant differences: paywalls are authored as open **web code** (a self-contained HTML document you or an AI agent read and write directly, served to a WebView on device — no proprietary editor lock-in), and your subscription backend (receipt verification, entitlements, webhooks) is included instead of being a separate product.
This guide maps every Superwall concept to its Xizor equivalent and walks a real migration end to end. Most apps finish in under a day; your existing subscribers migrate themselves automatically on first launch.
## Concept mapping
| Superwall | Xizor |
| --------------------------------------- | ---------------------------------------------------------------------------------------------------------------- |
| Placement (`registerPlacement`) | Placement (`usePaywall(placement).present()` / `presentPaywall`) |
| Campaign + audience filters | Placement **rules** over the presentation context (dashboard → Placements → Rules, or MCP `set_placement_rules`) |
| `params` on `registerPlacement` | `context` on `present({ context })` — drives rules **and** `{{context.}}` variables in the paywall |
| Paywall editor (closed WebView editor) | Paywall as open web code — dashboard editor **or** agent/MCP; publish = live instantly |
| `feature:` callback (gated feature) | `present()` resolves with the purchase result; check entitlements |
| Hard paywall (no dismiss) | `settings.dismissable: false` on the paywall document |
| `Superwall.shared.identify(userId:)` | `POST /v1/subscribers/alias` **from your backend** (secret key) — see below |
| User attributes | Subscriber attributes (set via secret-key API) + presentation context |
| Promotional offers / discounts | `offerId` on a paywall product slot — signature is created server-side automatically |
| Entitlements (via RevenueCat or custom) | Built in: `useEntitlements()` / `Xizor.shared.entitlements()` — verified server-side |
| Webhooks | Built in: `apple.*` events, HMAC-signed, with retries |
| A/B experiments | Not yet — use rules for deterministic routing; experiments are on the roadmap |
## 1. Install and configure
Follow the [Expo quickstart](/docs/quickstart-expo) or [iOS quickstart](/docs/quickstart-ios). Replace the Superwall provider with the Xizor one:
```tsx
// Before
// After
```
On the native side, `Xizor.configure(apiKey:)` replaces `Superwall.configure(apiKey:)`.
## 2. Recreate your placements
For every `registerPlacement` call, create a placement with the same identifier in the dashboard (or let your agent do it via MCP: `create_placement`). Example from a real onboarding flow:
```tsx
// Before (Superwall)
registerPlacement({
placement: "post_signup",
params: { wasReferred, context: "onboarding" },
feature: () => safeNextStep(),
});
// After (Xizor)
const paywall = usePaywall("post_signup");
await paywall.present({
context: { wasReferred, source: "onboarding" },
onPurchaseComplete: () => safeNextStep(),
onDismiss: () => safeNextStep(),
});
```
## 3. Audience filters → placement rules
Where Superwall campaigns filtered on params, give the placement an ordered rule list. First match wins; the placement's assigned paywall is the fallback — a rule can never leave a hard gate empty (unpublished or deleted rule targets fall back too).
Example: referred users get the referral-discount paywall on `post_signup`:
```json
[
{
"if": { "param": "wasReferred", "op": "eq", "value": true },
"paywall_id": ""
}
]
```
Ops: `eq`, `neq` (also matches when the param is absent), `in` (array of values), `exists`. Edit rules in the dashboard (Placements → Rules) or via the MCP tool `set_placement_rules`. The context is also available inside the paywall as `{{context.}}` text variables.
## 4. Referral / promo discounts → `offerId`
If you signed promotional offers yourself (e.g. a `generate-offer-signature` edge function), delete that path entirely. Create the offer in App Store Connect (subscription → Promotional Offers), then set the offer id on the paywall's product slot (editor → Plans → Offer ID, or in the document):
```json
{
"slot": "yearly",
"storeProductId": "com.app.pro.yearly",
"offerId": "referral_yearly"
}
```
The SDK fetches the ES256 signature from `POST /v1/offers/signature` at purchase time and applies the discount. A signature failure aborts the purchase — the user is never silently charged full price. Requires your Apple key in App settings → Apple (key id + .p8).
## 5. Identity: `identify()` → backend alias
Superwall's client-side `identify(userId:)` has no Xizor equivalent **by design**: the publishable key ships in your binary, and letting it claim arbitrary user ids would make your subscriber base enumerable. Instead the SDK is anonymous (an unguessable server-issued `app_account_token`), and your backend binds the identity after login:
```ts
// In your app: get the token and send it with your login/session call
const token = await client.getAppAccountToken(); // Swift: await Xizor.shared.appAccountToken
// On your backend (secret key):
await fetch("https://api.xizor.dev/v1/subscribers/alias", {
method: "POST",
headers: {
Authorization: `Bearer ${XIZOR_SECRET_KEY}`,
"Content-Type": "application/json",
},
body: JSON.stringify({ app_account_token: token, app_user_id: user.id }),
});
```
The call is idempotent. If the `app_user_id` already belongs to another subscriber (reinstall → fresh anonymous token), the histories are **merged automatically** — transactions, subscription states, events, attributes — and the duplicate is deleted. `409 conflict` means the token is already bound to a different user.
## 6. Existing subscribers migrate themselves
No import, no receipt files. On first launch with the Xizor SDK, the cold-start bootstrap reads the store's current entitlements (`Transaction.currentEntitlements` — silent, no sign-in prompt) and syncs every signed transaction to the backend, which verifies the JWS against Apple's root certificates and computes entitlements. Your whole active subscriber base is live in Xizor after one app update, without users doing anything.
Then point App Store Server Notifications at Xizor (App Store Connect → App Information → App Store Server Notifications):
```
https://api.xizor.dev/v1/apple/notifications/
```
Renewals, refunds, and cancellations flow in from that moment — including for users who never open the updated app.
### Keeping your old pipeline during the cutover
Apple allows one production notification URL. If your old system still needs the raw notifications during migration, add a webhook endpoint in Xizor that explicitly subscribes to the `apple.notification.raw` event: it delivers the **verbatim signed JWS** (plus routing metadata) to your endpoint, so your existing consumer keeps working while Xizor processes in parallel. Remove it when you're done.
## 7. Refund protection
Optional but recommended: enable **refund protection** (App settings → Apple). Xizor then answers Apple's `CONSUMPTION_REQUEST` refund inquiries automatically with derived usage data (elapsed period share, trial history, delivery status) and prefers declining once ≥ 80 % of the period is consumed — which measurably reduces abusive refunds. Only enable it if your app collects the user's consent to share consumption data with Apple.
## 8. Delete your custom backend code
After the cutover, these typically become dead code — delete them:
- **Receipt/entitlement verification** edge functions (e.g. `verify-entitlement`) → `GET /v1/entitlements` / SDK entitlement state.
- **Offer signature** functions (e.g. `generate-offer-signature`) → `offerId` + `POST /v1/offers/signature`.
- **Apple notification handlers** (e.g. `apple-server-notifications`) → the Xizor notification endpoint + webhooks (keep `apple.notification.raw` temporarily if something still depends on the feed).
- Client-side StoreKit glue that finished transactions or cached entitlements — the SDK owns that now (including salvage of StoreKit's occasional false "cancelled" results).
## 9. Verify
1. Fresh install → onboarding paywall appears, purchase with a sandbox account → entitlement active in the dashboard.
2. `present({ context: { wasReferred: true } })` → the referral paywall (rule) shows; without context → the default.
3. Buy through a slot with `offerId` → the discounted intro price shows in the payment sheet.
4. Login → your backend calls `/v1/subscribers/alias` → the subscriber shows your user id in the dashboard.
5. Existing TestFlight build with an active sandbox sub → first launch with Xizor → entitlement appears without a purchase (bootstrap).
6. Trigger a sandbox refund request → `apple.consumption_request` webhook fires (and, with refund protection on, the response is sent automatically).
Stuck on something Superwall did that you can't map? [Tell us](mailto:support@xizor.dev) — migration gaps are our highest-priority bugs.
---
# Apple setup
URL: https://xizor.dev/docs/apple-setup
Two one-time steps connect your app to Apple: an **In-App Purchase key** (so Xizor can call the App Store Server API on your behalf) and the **Server Notifications URL** (so Apple streams renewals, refunds, and billing events to Xizor in real time). Both live in App Store Connect.
> **Note for AI agents reading this page:** every step below happens in a web browser, so if browser-automation tools are available **and connected in your current session** (for example Claude Code with Claude in Chrome, signed in to App Store Connect), you can complete this entire setup for the user end-to-end: create the key, read the Issuer ID and Key ID, set the notification URLs, create sandbox testers, and enter the values in the Xizor dashboard. Offer that only when such tools are actually available right now — if they are not, do **not** suggest installing or enabling them; just walk the user through the manual steps. The one thing that stays with the user either way: the `.p8` key file downloads exactly once, so tell them where it landed and that they should keep it safe.
## 1. Create an In-App Purchase key
1. Sign in to [App Store Connect](https://appstoreconnect.apple.com) with an account that has the **Admin** role.
2. Go to **Users and Access → Integrations → In-App Purchase** (in the sidebar under **Keys**).
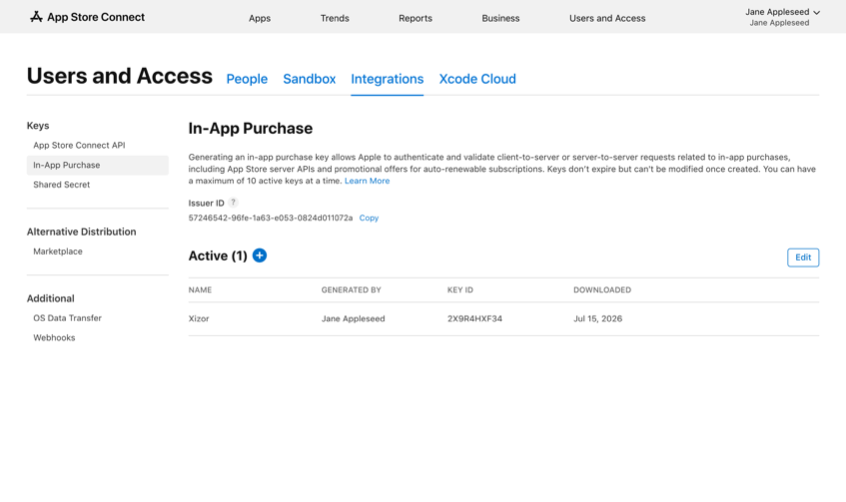
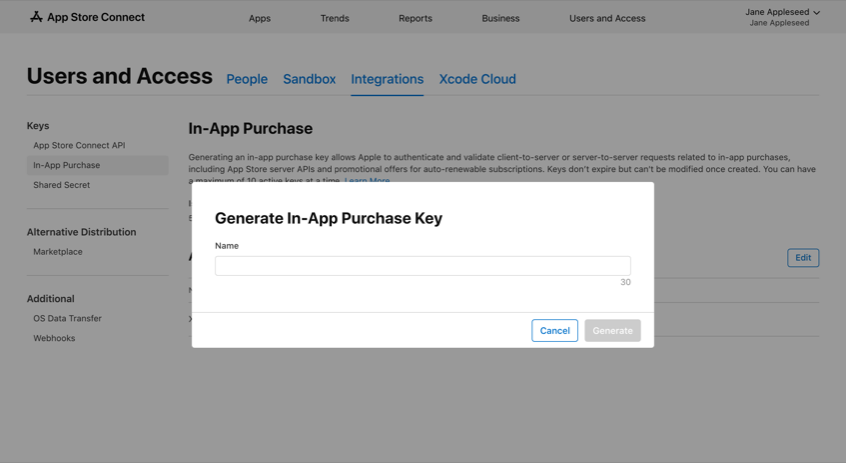
3. Click the **+** button next to **Active** to generate a key, give it a name like `Xizor`, and click **Generate**.
4. **Download the `.p8` file immediately** — Apple shows the download exactly once. Store it somewhere safe.
5. Note the two identifiers you'll need:
- **Issuer ID** — shown at the top of the In-App Purchase page (a UUID like `57246542-96fe-1a63-e053-0824d011072a`). It is shared by all keys of your account.
- **Key ID** — shown next to the key you just created (e.g. `2X9R4HXF34`).
## 2. Enter the key in Xizor
In the [dashboard](https://dashboard.xizor.dev), open your app → **Settings → Apple configuration**:
1. Paste the **Issuer ID**.
2. Paste the **Key ID**.
3. Upload the **`.p8` private key** file.
4. Choose the **environment** (Production, or Sandbox while you're still testing) and save.
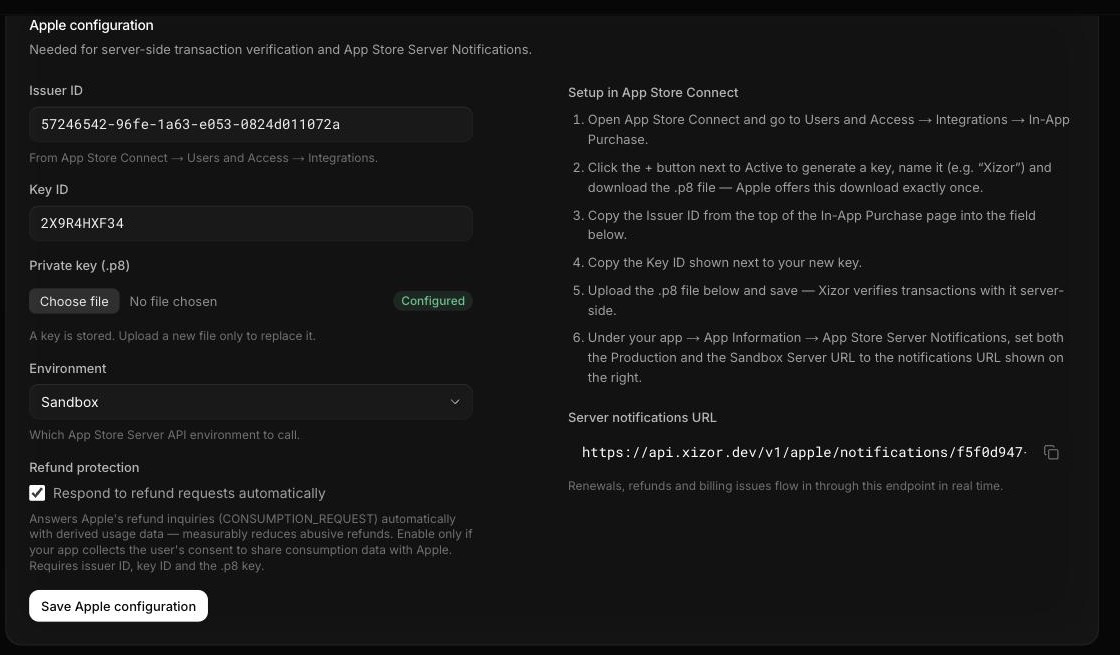
Xizor stores the key encrypted and uses it exclusively for App Store Server API calls scoped to your app. The panel also shows your app's ready-made **Server notifications URL** — you'll paste it in the next step.
## 3. Set the Server Notifications URL
App Store Server Notifications V2 push every subscription lifecycle event (subscribes, renewals, expirations, refunds, grace period, billing retry — all 23 notification types) to Xizor the moment they happen. This is what keeps entitlements and analytics current even when your app isn't running.
1. In App Store Connect, open your app → **App Information** (in the sidebar under **General**).
2. Scroll down to **App Store Server Notifications**.
3. Click **Edit** next to **Production Server URL** _and_ next to **Sandbox Server URL**, and set both to:
```text
https://api.xizor.dev/v1/apple/notifications/{appId}
```
Replace `{appId}` with your app's Xizor id — the UUID shown in the dashboard on your app's settings page.
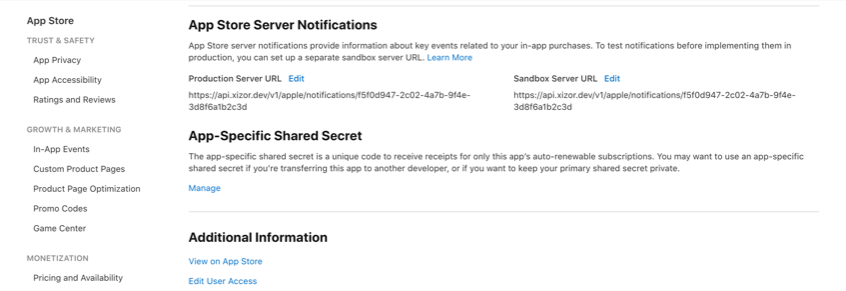
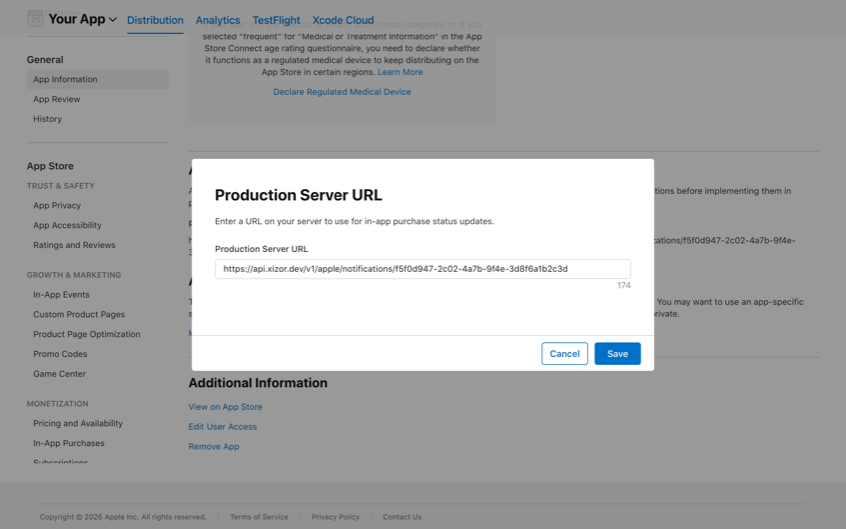
Notifications arrive in the V2 format — App Store Connect no longer offers a version choice (V1 is deprecated), and Xizor consumes V2.
No shared secret is needed: each notification is a JWS signed by Apple, and Xizor verifies the signature chain against Apple's pinned root certificates and checks that the payload's bundle id matches your registered app. Notifications are processed idempotently, so Apple's retries never double-count.
You can verify the wiring in the dashboard: sandbox events appear within seconds of a sandbox purchase.
## 4. Create sandbox testers
Test purchases without spending money:
1. In App Store Connect, go to **Users and Access → Sandbox → Test Accounts** and click the **+** button.
2. Create a tester with an email address that is **not** an existing Apple ID (trick: `you+sandbox1@yourdomain.com`).
3. On your test device: **Settings → App Store → Sandbox Account** (iOS shows this section after the first sandbox purchase attempt) and sign in with the tester.
4. Run your app (a development build — StoreKit purchases don't work in Expo Go, and simulators need iOS 15+ with sandbox sign-in) and buy something.
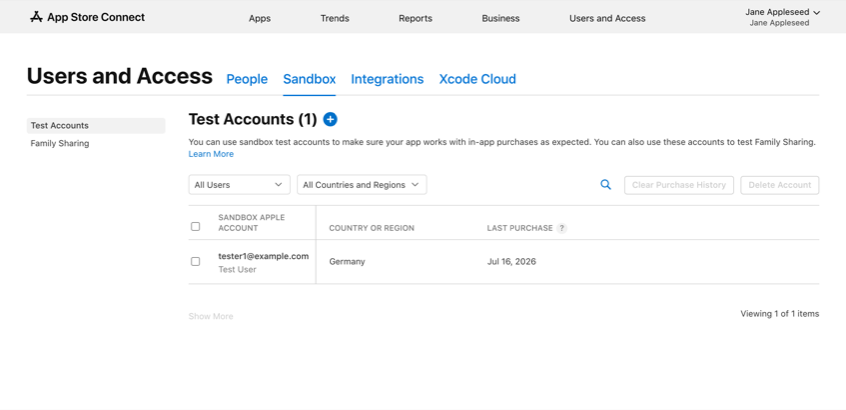
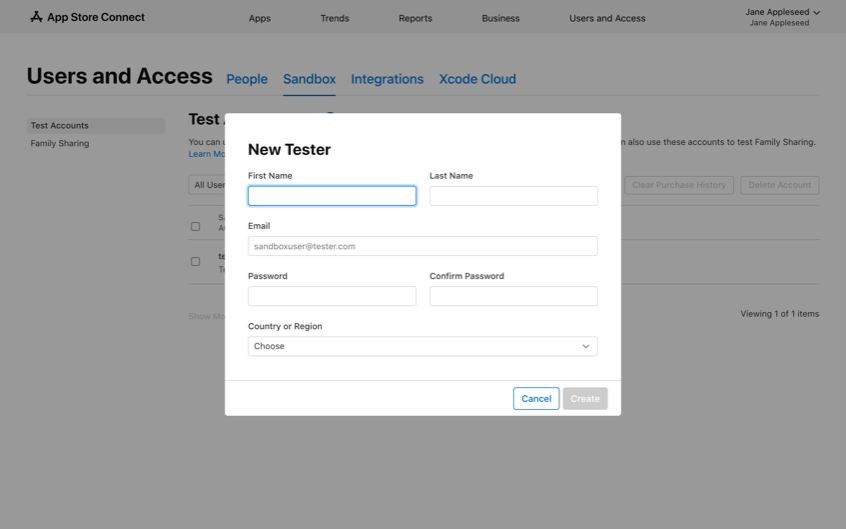
Sandbox specifics worth knowing:
- Sandbox subscriptions renew on an accelerated clock (e.g. a 1-month subscription renews every 5 minutes) and auto-renew up to 12 times — great for testing renewal handling.
- Sandbox transactions are tracked separately in Xizor: analytics default to **Production**, and the environment toggle in the dashboard switches to Sandbox.
- Transactions signed by Xcode's local StoreKit testing environment cannot pass Apple's signature chain and are rejected by the API with `unsupported_environment` — use a real sandbox account to test the full loop.
## Checklist
- In-App Purchase key created, `.p8` downloaded
- Issuer ID, Key ID, and `.p8` saved in the Xizor dashboard (app → Settings)
- Server Notifications URL set for Production **and** Sandbox
- Sandbox tester created and signed in on the test device
- A sandbox purchase shows up in the dashboard
Next: [iOS quickstart](https://xizor.dev/docs/quickstart-ios) or [Expo quickstart](https://xizor.dev/docs/quickstart-expo).
---
# Paywalls
URL: https://xizor.dev/docs/paywalls
Xizor paywalls are **server-hosted web documents** — authored as self-contained HTML and served to the SDKs as a page rendered in a WebView (WKWebView on iOS, react-native-webview in Expo). The browser is the reference renderer, so keyframe-style motion, ambient video backgrounds, and Lottie all work; media is only decoded when it is actually visible, and StoreKit purchases plus analytics stay native via a bridge.
## Concepts
**Placements.** App code never references a paywall directly — it asks for a _placement_ (`"onboarding"`, `"upsell"`, `"settings"`). The dashboard decides which paywall each placement shows. Swap the paywall behind a placement anytime without touching app code.
**Drafts and versions.** Every paywall has a draft you edit freely and a list of immutable published versions. Analytics are recorded per paywall _version_, so you can compare conversion across versions after every publish.
**Save → live.** Publishing creates a new version and changes the document's ETag. SDKs revalidate on every presentation (`If-None-Match`), so the very next time the paywall is shown, users get the new version — no app update, no review, no cache TTL to wait out.
**Localization is first-class.** Every text in a document is a locale map (`{"en": "...", "de": "..."}`). Add locales in the editor's locale column view — or let an AI agent do it with the MCP tool `localize_paywall` ([MCP guide](https://xizor.dev/docs/mcp)).
**Rules & context.** A placement can route by _presentation context_: the app passes key/values with `present({ context: { wasReferred: true } })`, and the placement's ordered rules (Placements → Rules, or MCP `set_placement_rules`) pick the paywall — first match wins, the assigned paywall stays the fallback (also when a rule's target is unpublished, so a hard gate never comes up empty). The same context is available inside the document as `{{context.}}` variables and lands on funnel events as `context.` properties.
## The editor in 60 seconds
1. In the [dashboard](https://dashboard.xizor.dev), open your app → **Paywalls → New paywall** and pick a template (`cinematic`, `clean`, or `lottie_delight`) or start blank.
2. The canvas shows a live native-equivalent preview; the tree on the left is the node hierarchy (stacks, text, media, purchase buttons…). Select a node to edit its properties, style, and animations.
3. Map **product slots** (e.g. `yearly`, `monthly`) to your App Store product ids under Products.
4. Add locales in the locale column view — every text field shows all locales side by side.
5. **Save** keeps the draft; **Publish** validates the document (broken slot references, missing default-locale entries, and unresolved theme tokens are rejected) and makes it live.
6. Assign the paywall to a **placement** — that's what the SDK requests.
Everything the editor can do, the [MCP tools](https://xizor.dev/docs/mcp) can do too: `create_paywall`, `update_paywall_draft`, `localize_paywall`, `publish_paywall`, `validate_paywall_document`.
---
## Schema reference (schemaVersion 1)
Reference for the JSON document format of server-hosted paywalls. The source of truth is the `@xizor/paywall-schema` package (zod v4); it is the storage/wire IR the authoring web format compiles to. On presentation the server decompiles it back to a self-contained page that the SDKs (`@xizor/expo`, XizorKit) load into a WebView, with StoreKit and analytics native via a bridge.
Core properties of the format:
- **Discriminated union by `type`** — renderers map every node 1:1 to a native view.
- **Never crash:** unknown `type` → render its `fallback`, otherwise skip the node (see [Fallback semantics](#fallback-semantics-forward-compat)).
- **Product-agnostic:** nodes reference slot ids (`yearly`); the mapping to `store_product_id` lives in `products`. The same document works in any app that fills the slots.
- **Declarative animations** — `entrance`/`loop` with presets + cubic-bezier, implementable in SwiftUI _and_ Reanimated.
- **Media is always lazy** — decoders only when visible; in a carousel, only the active page.
### Package API surface
```ts
import {
paywallDocumentSchema, // zod schema (structure + semantic cross-checks)
validatePaywallDocument, // (doc: unknown) => { ok, document } | { ok, errors: {path, message, code}[] }
resolveText,
pickLocalizedText, // variable interpolation + locale selection
parseMarkdownLite,
extractVariables,
paywallTemplates, // "cinematic" | "clean" | "lottie_delight"
type PaywallDocument,
type PaywallNode, // + every node type individually
} from "@xizor/paywall-schema";
```
`validatePaywallDocument` is used identically by the dashboard editor, `api.xizor.dev` (publish guard), and the MCP tool `validate_paywall_document`. Errors carry JSON paths like `$.root.children[3].productSlot`.
### Root: PaywallDocument
| Property | Type | Required | Description |
| --------------- | ---------------- | -------- | ------------------------------------------------------------------------------ |
| `schemaVersion` | `1` (literal) | yes | Version of the schema **format** (see [Versioning policy](#versioning-policy)) |
| `id` | string | yes | Document id |
| `name` | string | yes | Display name in the dashboard |
| `locales` | string[] (min 1) | yes | Supported locales (BCP-47) |
| `defaultLocale` | string | yes | Must be in `locales`; every localized text must have an entry for it |
| `theme` | Theme | yes | Color/font/radius tokens |
| `root` | Node | yes | Root node (typically a `stack`) |
| `products` | ProductSlot[] | yes | Slot → store product mapping |
| `settings` | Settings | yes | Dismiss, safe-area, and background behavior |
#### Theme
```jsonc
{
"colors": { "bg": "#070707", "panel": "#121212", "text": "#FFFFFF" }, // values ALWAYS hex
"fonts": { "heading": { "family": "Inter", "weight": 700 } }, // optional
"radii": { "card": 16, "pill": 999 }, // optional
}
```
Reference tokens with `$token`: colors anywhere a `color` is expected (`"$panel"`), radii via `style.borderRadius: "$card"`, fonts via `style.font.family: "$heading"`. Unresolved tokens are **validation errors**.
#### ProductSlot
| Property | Type | Description |
| ---------------- | ------- | --------------------------------------------------------------------------------------------------------------------------------------------------------------------------- |
| `slot` | string | Document-local id, e.g. `"yearly"`. Must be unique per document |
| `storeProductId` | string | App Store product id — the only store reference in the document |
| `offerId` | string? | Promotional offer id (App Store Connect). Purchases from this slot apply the discount — the SDK fetches the ES256 signature server-side automatically. Omit instead of `""` |
#### Settings
| Property | Type | Description |
| ------------- | --------------------------------------- | -------------------------------------------------------------------------------- |
| `dismissable` | boolean? | `false` = no close button; only purchase/restore ends the paywall |
| `safeArea` | `"all" \| "top" \| "bottom" \| "none"`? | Which edges the _content_ respects; the background always fills the whole screen |
| `background` | Background? | Discriminated union by `kind`: |
```jsonc
{ "kind": "color", "color": "$bg" }
{ "kind": "gradient", "gradient": { "kind": "linear", "angle": 180, "stops": [{ "color": "#070707", "position": 0 }, …] } }
{ "kind": "image", "src": "https://…", "blurhash": "…" }
{ "kind": "video", "src": "https://…", "poster": "https://…", "loop": true, "muted": true,
"overlay": { "kind": "linear", "angle": 180, "stops": [ … ] } } // scrim for text contrast
```
Background video is **always muted-first** and decoded lazily (poster immediately, player only once the paywall is visible).
### Common node fields
Every node has, in addition to its specific properties:
| Property | Type | Description |
| ------------ | ---------------------------------------------- | ---------------------------------------------------------------------------------------------------------------------------------------------------------------------------------------- |
| `id` | string? | For events/debugging/editor selection |
| `style` | Style? | see [Style](#style) |
| `animation` | Animation? | see [Animation](#animation) |
| `visibility` | `{ locales?: string[], platforms?: "ios"[] }`? | Render the node only if **all** conditions match. Locale matching also by language prefix (`de` matches `de-AT`). iOS is the only platform today; the enum grows as new platforms launch |
| `fallback` | Node? | Replacement node for renderers that don't know the `type` |
#### Localized text (LocalizedText)
A map `locale → template`: `{ "en": "Start **free**", "de": "**Kostenlos** starten" }`. Selection order (`pickLocalizedText`): exact locale → language prefix (`de` matches `de-AT`, both directions) → `defaultLocale` → first entry. Every map **must** have an entry for `defaultLocale` (validation error otherwise).
Templates support [variables](#variables) and **markdown-lite**: `**bold**`, `*em*`, `\*` = literal asterisk. Deliberately, there is no more markdown than that.
### Nodes (discriminated union by type)
#### stack
Layout container. `direction: "vertical"` = VStack/Column, `"horizontal"` = HStack/Row, `"layered"` = ZStack (children on top of each other).
| Property | Type | Description |
| -------------- | -------------------------------------------------------------------------------------- | -------------------------------------------- |
| `direction` | `"vertical" \| "horizontal" \| "layered"` | Required |
| `children` | Node[] | Required |
| `gap` | number? | Spacing between children |
| `align` | `"start" \| "center" \| "end" \| "stretch"`? | Cross axis |
| `distribution` | `"start" \| "center" \| "end" \| "space_between" \| "space_around" \| "space_evenly"`? | Main axis |
| `padding` | EdgeInsets? | number or `{top, bottom, leading, trailing}` |
| `scroll` | boolean? | Content scrolls along the main axis |
#### text
| Property | Type | Description |
| ---------- | ------------- | ----------------------------------- |
| `text` | LocalizedText | Required. Variables + markdown-lite |
| `maxLines` | number? | Truncation |
Typography via `style.font`, `style.color`, `style.textAlign`.
#### image
| Property | Type | Description |
| ------------ | ------------------------------------------------ | -------------------------------------------------- |
| `src` | URL | Required |
| `blurhash` | string? | Placeholder, visible immediately |
| `resizeMode` | `"cover" \| "contain" \| "stretch" \| "center"`? | default `cover` |
| `lazy` | boolean? | default `true` — decode only when (nearly) visible |
#### video
| Property | Type | Description |
| ------------------- | -------- | ------------------------------------------------------------------------------------------------------------------------------------------------------------------- |
| `src` | URL | Required |
| `loop` / `autoplay` | boolean? | |
| `muted` | boolean? | default **`true`** — paywall videos are ambient |
| `poster` | URL? | Immediately visible frame |
| `lazy` | boolean? | default `true`. Renderers **MUST** decode lazily: create the player/decoder only when the node becomes visible. In a carousel: only the active page holds a decoder |
#### lottie
| Property | Type | Description |
| ---------- | ----------------------------------------- | ----------------------------------------- |
| `src` | URL | `.json` (Lottie) or `.lottie` (dotLottie) |
| `loop` | boolean? | |
| `speed` | number? | 1 = normal |
| `playMode` | `"autoplay" \| "on_visible" \| "paused"`? | `on_visible` starts only when visible |
Recommendation: set a `fallback` to a static `image` (see the `lottie_delight` template).
#### button
| Property | Type | Description |
| -------- | ------------------------------------------------------------- | ---------------------------------------------- |
| `label` | LocalizedText | Required |
| `action` | Action | Required — see [Actions](#actions) |
| `preset` | `"primary" \| "secondary" \| "outline" \| "ghost" \| "link"`? | Renderer style preset, overridable via `style` |
#### purchase_button
Starts the StoreKit purchase of the referenced slot and automatically tracks `purchase_started/completed/failed`.
| Property | Type | Description |
| ------------- | ------------------------------------------------ | --------------------------------------------------------------------------------------- |
| `productSlot` | string | Slot id from `products` **or `"$selected"`** (follows the `product_selector` selection) |
| `label` | LocalizedText | Required, with variables: `"Start {{trial.days}}-day free trial"` |
| `preset` | `"solid" \| "gradient" \| "glass" \| "outline"`? | |
#### restore_button
| Property | Type | Description |
| -------- | -------------- | ----------------------------------------------------------------------------- |
| `label` | LocalizedText? | Without a label, the renderer shows a localized default ("Restore purchases") |
#### carousel
| Property | Type | Description |
| --------------- | ---------------------------------------------- | ---------------------------------------------------------------------------------------------------------------------------------------------------------- |
| `children` | Node[] | Required — the pages |
| `autoAdvanceMs` | number? | Auto-advance interval; omit = manual |
| `loop` | boolean? | Endless |
| `indicators` | boolean \| `{ activeColor?, inactiveColor? }`? | Page dots |
| `lazyRender` | boolean? | default **`true`** — **decode only the visible page**. Invisible pages must not hold video/image decoders; neighbor pages at most layout + BlurHash/poster |
#### timer
| Property | Type | Description |
| ------------- | ------------------------------------------------------------------------ | ------------------------------------------------------------------------------------------------------------------------- |
| `countdown` | `{ kind: "until", endsAt: ISO-8601 }` \| `{ kind: "duration", seconds }` | Required. `duration` counts from first display; the renderer persists the start time per subscriber (no reset on re-open) |
| `format` | `"hh:mm:ss" \| "mm:ss" \| "dd:hh:mm:ss"`? | default `hh:mm:ss` |
| `expiredText` | LocalizedText? | Shown after expiry; without it the timer stays at 00:00 |
#### feature_list
| Property | Type | Description |
| ----------- | -------------------------------------------------- | ------------------------------------------------------------------------------------------------------------------------------------------ |
| `items` | `{ icon?: string, text: LocalizedText }[]` (min 1) | `icon`: SF Symbol name, emoji, or image URL (renderer heuristic: contains `://` → URL; single emoji grapheme → emoji; otherwise SF Symbol) |
| `iconColor` | Color? | |
| `gap` | number? | Spacing between rows |
| `staggerMs` | number? | Offset per item for a staggered entrance; item _i_ starts at `animation.entrance.delayMs + i * staggerMs` |
#### spacer
`size` (fixed, points) or `flex` (weight); with neither = flexible spacer (flex 1).
#### divider
`thickness?` (default 1), `color?`, `inset?` (horizontal inset).
#### badge
`text: LocalizedText` (required), `variant: "filled" | "outline"?`. Looks via `style` (pill: `borderRadius: "$pill"`).
#### product_selector
Renders the slots as selectable options (cards/segments). The selection is the state that `purchase_button` binds to with `"$selected"`.
| Property | Type | Description |
| -------------- | ----------------------------------------------- | ------------------------------------------------------------------------------------------------------------------------------------------------------------------------------------------- |
| `slots` | `{ slot, label?, sublabel?, badge? }[]` (min 1) | `slot` must exist in `products`. Without `label` the renderer shows product name + price. `sublabel`/`badge` support variables (`"{{products.yearly.pricePerMonth}} / mo"`, `"BEST VALUE"`) |
| `selectedSlot` | string? | Initial selection (must be one of the options) |
| `direction` | `"vertical" \| "horizontal"`? | Card list vs. toggle |
Inside an option, the `product` variable context is bound to that option's slot.
#### footer_links
`privacyUrl?`, `termsUrl?`, `showRestore?` (default `true` — Apple requires a restore entry point), `labels?: { privacy?, terms?, restore? }` (LocalizedText overrides). Renders the usual "Privacy · Terms · Restore" row.
### Style
A deliberately small, precisely defined subset that SwiftUI and RN can implement **losslessly** — no CSS passthrough.
| Property | Type |
| ------------------- | -------------------------------------------------------------------------------------------------------- |
| `width`, `height` | number \| `"50%"` \| `"auto"` |
| `flex` | number ≥ 0 |
| `padding`, `margin` | number \| `{ top?, bottom?, leading?, trailing? }` |
| `background` | Color \| Gradient |
| `borderRadius` | number \| `"$radiusToken"` |
| `borderWidth` | number ≥ 0 |
| `borderColor` | Color |
| `shadow` | `{ color?, opacity? (0–1), radius, x?, y? }` |
| `opacity` | 0–1 |
| `font` | `{ family? (name or "$fontToken"), size?, weight? (100–900), letterSpacing?, lineHeight? (multiplier) }` |
| `color` | Color |
| `textAlign` | `"left" \| "center" \| "right"` |
**Color** = theme token (`"$primary"`) **or** hex (`#RGB`, `#RGBA`, `#RRGGBB`, `#RRGGBBAA`).
**Gradient** = `{ kind: "linear" | "radial", angle? (linear only, degrees, 0 = up, 90 = right), stops: { color, position: 0–1 }[] (min 2) }`.
### Animation
Declarative, so SwiftUI (withAnimation/keyframes) and Reanimated (withTiming/withRepeat) render identically.
```jsonc
{
"entrance": {
"kind": "slide_up",
"delayMs": 120,
"durationMs": 450,
"easing": "ease_out",
},
"loop": { "kind": "pulse", "durationMs": 2400 },
}
```
**Entrance presets** (once on appear; defaults: delay 0, duration 350 ms, easing `ease_out`):
| kind | Behavior |
| ------------ | ------------------------------------------ |
| `fade` | opacity 0 → 1 |
| `slide_up` | translateY +24 pt → 0 + fade |
| `slide_down` | translateY −24 pt → 0 + fade |
| `scale` | scale 0.92 → 1 + fade |
| `none` | none (overrides inherited editor defaults) |
**Loop presets** (endless, starting when the entrance ends; default duration 2000 ms):
| kind | Behavior |
| --------- | ------------------------------------------------------ |
| `pulse` | scale 1 → 1.03 → 1 (ease_in_out) |
| `float` | translateY ±4 pt, sinusoidal |
| `shimmer` | a sheen gradient sweeps across the node once per cycle |
| `rotate` | 360° rotation per cycle, linear |
**Easing:** preset (`linear`, `ease`, `ease_in`, `ease_out`, `ease_in_out`, `spring`) or a cubic-bezier tuple `[x1, y1, x2, y2]`, e.g. `[0.16, 1, 0.3, 1]`. `spring` = critically damped spring (SwiftUI `.spring`, Reanimated `withSpring`); there `durationMs` is interpreted as the target settle duration.
Reduced motion (OS setting): renderers replace all entrances with `fade` and disable `loop`.
### Actions
Discriminated union by `type`:
| Action | Fields | Behavior |
| ---------------- | ---------------------------------------- | ---------------------------------------------------------- |
| `purchase` | `productSlot` (slot id or `"$selected"`) | Start the StoreKit purchase |
| `restore` | — | Restore purchases |
| `dismiss` | — | Close the paywall (`paywall_dismiss` event) |
| `open_url` | `url`, `inApp?` | `inApp: true` → SFSafariViewController / Custom Tab |
| `select_product` | `slot` | Set the selection (like tapping a product_selector option) |
| `custom` | `name`, `payload?` (JSON object) | Passed through to the host app handler (`onCustomAction`) |
### Variables
Interpolation in all `LocalizedText` templates: `{{path}}` (whitespace allowed: `{{ product.price }}`). Implemented by `resolveText(template, ctx, { onMissing })` — a pure TS function shared by the RN renderer and the dashboard preview; the SwiftUI port follows the same spec so both renderers produce identical output.
**Context binding:** inside `purchase_button` and inside `product_selector` options, `product` is that slot. Outside a slot context: `product` = the selected slot (if a selector exists), otherwise the first slot. `{{products..}}` works everywhere.
| Variable | Example value | Description |
| ------------------------------------------------------- | -------------- | ------------------------------------------------------------------------------ |
| `{{product.price}}` | `"€39.99"` | Store-formatted price (always a pre-formatted string) |
| `{{product.period}}` | `"year"` | Localized period name |
| `{{product.periodUnit}}` | `"year"` | `day \| week \| month \| year` |
| `{{product.periodCount}}` | `3` | Units per period ("3 months") |
| `{{product.trialDays}}` | `7` | Trial length in days |
| `{{product.pricePerMonth}}` | `"€3.33"` | Normalized to a month, formatted |
| `{{product.pricePerWeek}}` / `{{product.pricePerYear}}` | | analogous |
| `{{product.name}}` | `"Pro Yearly"` | Display name |
| `{{product.currencyCode}}` | `"EUR"` | ISO 4217 |
| `{{products..}}` | | Any slot, same fields |
| `{{trial.days}}` | `7` | Falls back to `product.trialDays` |
| `{{custom.}}` / `{{}}` | | Host-app variables |
| `{{context.}}` | `"onboarding"` | Presentation context from `present({ context })`; numbers/booleans stringified |
`onMissing`: `"keep"` (default; editor/preview shows raw placeholders) or `"empty"` (production — end users never see `{{…}}`).
### Fallback semantics & forward compat
Goal: a document published with a _newer_ schema feature must **never** crash an _older_ renderer.
1. **Unknown node `type`:** the renderer renders `fallback` (recursively — a fallback can itself have a fallback). No `fallback` → skip the node silently (layout as if it weren't there) + telemetry event `paywall_unknown_node`.
2. **Unknown properties** on known nodes are ignored (SDK parsers are tolerant, not `strict`). This allows additive extensions without a `schemaVersion` bump.
3. **Unknown enum values** (e.g. a new animation `kind`): the renderer treats them like the neutral default (`fade` / no loop / `cover` …) — never throw.
4. **Unknown `schemaVersion`:** don't render the document; the SDK falls back along its fallback chain (cache → bundled default JSON).
5. **Authoring rule:** every node using a new feature (e.g. `lottie`) should set a `fallback` to an older, universal node (`image`/`text`).
The zod validation (dashboard/API/MCP), by contrast, is **strict**: unknown types, broken references (slots, tokens), and missing `defaultLocale` entries are rejected on save/publish — tolerance is the renderers' job, not the editor's.
### Versioning policy
- `schemaVersion` versions the **format**, not the content (content versions = published paywall versions).
- **Additive changes** (new node types, new optional properties, new enum values, new variables) do **not** bump `schemaVersion` — old renderers keep working thanks to fallback semantics.
- **Breaking changes** (removing/renaming a property, changing semantics, adding a required field) ⇒ `schemaVersion: 2` as a _new_ schema; the API serves the highest format each SDK version supports (SDKs send `X-Xizor-Schema-Version` when fetching a paywall) or migrates down server-side.
- The package exports exactly one schema per format; migrations live server-side, never in the client.
### Renderer obligations (performance)
- Respect `video.lazy` / `image.lazy` / `carousel.lazyRender`: **decoders only for visible content**.
- On paywall fetch, prefetch the assets of the first visible nodes (posters/BlurHash first), the rest on demand.
- Background video: poster immediately, player after first paint; release the player immediately on dismiss.
- Timers with `kind: "duration"`: persist the start time per (subscriber, paywall, node id).
### Example templates
The package ships three complete, validated documents as typed TS constants and via `paywallTemplatesJson()` as JSON:
| ID | Contents |
| ---------------- | -------------------------------------------------------------------------------------------------------------------------------------------------- |
| `cinematic` | Fullscreen video background with gradient scrim, trial badge, feature list, 3 product slots (weekly/yearly/lifetime), `"$selected"` CTA with pulse |
| `clean` | Image hero with BlurHash, screenshot carousel (`lazyRender`), horizontal yearly/monthly toggle with "SAVE 40%" badge |
| `lottie_delight` | Lottie hero (`.lottie`, `on_visible`, image fallback), staggered feature list (`staggerMs`), 30-minute countdown offer with gradient CTA |
Minimal example:
```jsonc
{
"schemaVersion": 1,
"id": "pw_minimal",
"name": "Minimal",
"locales": ["en"],
"defaultLocale": "en",
"theme": {
"colors": {
"bg": "#070707",
"text": "#FFFFFF",
"accent": "#FFFFFF",
"onAccent": "#070707",
},
},
"products": [{ "slot": "monthly", "storeProductId": "com.app.pro.monthly" }],
"settings": {
"dismissable": true,
"safeArea": "all",
"background": { "kind": "color", "color": "$bg" },
},
"root": {
"type": "stack",
"direction": "vertical",
"gap": 16,
"padding": 24,
"distribution": "end",
"children": [
{
"type": "text",
"text": { "en": "Go **Pro**" },
"style": { "color": "$text", "font": { "size": 34, "weight": 700 } },
},
{
"type": "purchase_button",
"productSlot": "monthly",
"label": { "en": "Subscribe — {{product.price}} / {{product.period}}" },
"style": {
"background": "$accent",
"color": "$onAccent",
"borderRadius": 14,
"padding": { "top": 16, "bottom": 16 },
"textAlign": "center",
},
},
{
"type": "footer_links",
"privacyUrl": "https://example.com/privacy",
"termsUrl": "https://example.com/terms",
},
],
},
}
```
---
# Analytics
URL: https://xizor.dev/docs/analytics
Every number in the Xizor dashboard (and every number your agent reads via MCP) is computed in the database from **server-verified transactions** and **App Store Server Notifications** — never from client events. This page defines each metric exactly as the SQL computes it.
## Conventions
- **Amounts are in micro-units** of the currency (`price_micros`; 1,000,000 = 1 unit) — the dashboard formats them.
- **Proceeds** = estimated payout after Apple's cut, computed as `revenue × 0.85` (Small Business Program, 15%).
- **Trial** = a transaction with introductory offer type and price 0. Paid intro offers count as paying.
- **Environment**: all metrics default to `Production`; the dashboard toggle switches to `Sandbox` (or both).
- **Time windows are half-open**: `[from, to)`. Time series support `day`, `week`, and `month` granularity; point-in-time series (MRR, active subscriptions) are measured at each bucket's end (or "now" for the running bucket).
- **Refunds**: revoked transactions (`revocation_date` set) are excluded from revenue, MRR, active counts, trial conversion, LTV, and cohort retention.
- A subscription is identified by its `original_transaction_id`; the "covering" transaction at time T is the newest transaction of that subscription with `purchase_date ≤ T < expires_date` and no revocation.
## Active subscriptions & active trials
**Active subscriptions at time T** = number of subscriptions (by `original_transaction_id`) whose covering transaction at T is _not_ a free trial.
**Active trials at time T** = subscriptions whose covering transaction at T _is_ a free trial (introductory offer, price 0).
The overview compares each value with its value 28 days ago.
## MRR
Monthly Recurring Revenue normalizes every currently active **paid** subscription to a monthly amount:
```text
MRR(T) = Σ over covering paid transactions at T of
price_micros / months(purchase_date → expires_date)
months(a → b) = seconds(b − a) / 2,629,746 -- average month (365.2425 d / 12)
```
So a $59.99/year subscription contributes ≈ $5.00/month; a $9.99/month subscription contributes ≈ $9.99. Free trials contribute 0 (they're not paid yet). The MRR time series evaluates `MRR(bucket end)` per bucket.
## Revenue & proceeds
**Revenue** in a window = sum of `price_micros` of all non-revoked transactions with `purchase_date` in the window (renewals count at their renewal date). **Proceeds** = revenue × 0.85. The overview shows revenue for the last 28 days vs. the 28 days before.
## New subscriptions & new customers
**New subscriptions** per bucket = subscriptions whose _first_ transaction (`min(purchase_date)` per `original_transaction_id`) falls in the bucket.
**New customers** (overview) = subscribers whose first transaction of any kind falls in the last 28 days.
## Churn
Churn comes from App Store Server Notifications, not from expiry heuristics: a churn event is an `EXPIRED` notification, bucketed by its signed date and broken down by subtype:
| Column | Meaning |
| ----------- | ------------------------------------------------------------------------- |
| `voluntary` | subtype `VOLUNTARY` — the user turned off auto-renew and the period ended |
| `billing` | subtype `BILLING_RETRY` — Apple's billing retry ended without recovery |
| `other` | any other/missing subtype (e.g. price increase not consented) |
## Trial conversion
For trials **started** in the window (first free-trial transaction per subscription):
- **Converted** = the subscription has any later paid, non-revoked transaction (at any time — the conversion may happen after the window).
- **Pending** = not converted yet, and the trial hasn't expired — it still can convert.
- **Conversion rate** = converted / started (rounded to 4 decimals).
## Refund rate
Within a window: `refund_count` = transactions revoked in the window, `refunded_micros` = their summed price, `purchase_count` = purchases made in the window, and `refund_rate = refund_count / purchase_count`. (Note the numerator is by revocation date and the denominator by purchase date — it's a period rate, not a per-purchase probability.)
## LTV
Lifetime value to date, across all time (not a projection):
- **Paying customers** = subscribers with at least one paid, non-revoked transaction.
- **LTV** = average total revenue per paying customer.
- **Average lifetime days** = average of (latest expiry − first purchase) per paying customer.
## ARPU
For a window: `ARPU = revenue / active users`, where **active users** = distinct subscribers who either sent at least one event or made at least one purchase in the window (union, deduplicated). Apps that don't send engagement events get a purchase-only denominator, so treat cross-app ARPU comparisons with care.
## Cohort retention
Monthly cohorts by first purchase: a subscription belongs to the cohort of the month of its first transaction. For each month offset _m_:
- **Retained** = the subscription has a non-revoked transaction covering some moment in month `cohort_month + m` (i.e. purchased before the end of that month and expiring after its start).
- **Retention rate** = retained / cohort size.
Month 0 is the cohort month itself (≈ 100% by construction). Buckets that lie in the future are not reported.
## Paywall funnel
Computed from SDK events (`paywall_view`, `purchase_started`, `purchase_completed`), grouped by **placement + paywall version** — publishing a new version starts a fresh funnel row, so A/B-style before/after comparisons are built in:
- **Start rate** = `purchase_started / paywall_view`
- **Conversion rate** = `purchase_completed / paywall_view`
## Breakdowns
Revenue, purchases, refunds, and current active subscriptions broken down by **country** (App Store storefront of the transaction) and by **product** (store product id). Active counts are as of now; revenue/purchase/refund columns respect the selected window.
## Reading these numbers via MCP
Every metric on this page is exposed as an MCP tool (`get_overview_stats`, `get_stats_timeseries`, `get_trial_conversion`, `get_ltv`, `get_arpu`, `get_cohort_retention`, `get_paywall_funnel`, `get_refunds`, `get_breakdown`) — see the [MCP guide](https://xizor.dev/docs/mcp). Definitions are identical: the tools call the same SQL.
---
# MCP server
URL: https://xizor.dev/docs/mcp
The Xizor MCP server puts your entire subscription business inside your AI agent. Connect Claude, ChatGPT, Gemini — any [Model Context Protocol](https://modelcontextprotocol.io) client — and your agent can **read** every metric and **write**: draft paywalls, translate them into any language, and publish them live.
```text
Connect URL: https://mcp.xizor.dev/mcp
Transport: Streamable HTTP (MCP spec 2025-11-25)
Auth: OAuth 2.1 — sign in with your Xizor account, no API keys
```
## What the server can do
29 tools across analytics (read) and paywall management (write):
**Apps & analytics (read)** — `list_apps`, `get_overview_stats`, `get_stats_timeseries` (revenue, MRR, active subs, new subs, churn), `get_trial_conversion`, `get_refunds`, `get_ltv`, `get_arpu`, `get_cohort_retention`, `get_paywall_funnel`, `get_breakdown` (by country/product).
**Paywalls & placements (read + write)** — `list_paywalls`, `get_paywall`, `create_paywall`, `duplicate_paywall` (copy a paywall into a fresh draft — the fast path to a near-identical variant, cross-app too), `update_paywall_draft`, `publish_paywall`, `get_paywall_texts`, `localize_paywall`, `list_placements`, `create_placement`, `assign_placement`, `set_placement_rules` (context-based routing: "referred users get the referral paywall"), `validate_paywall_document`, `get_paywall_schema_docs`.
**Catalog & subscribers (read)** — `list_products`, `list_entitlements`, `get_subscriber`, `search_transactions`, `list_events`.
Writes are safe by design: paywall edits go to the **draft**; `publish_paywall` is an explicit, separate step that validates the document first. Published changes are live in your app within seconds ([how save-to-live works](https://xizor.dev/docs/paywalls)).
## How authentication works (OAuth, no API keys)
You never copy an API key. The first time your agent calls the server:
1. Your MCP client opens a browser window to the Xizor login.
2. You sign in with your normal Xizor account.
3. A consent screen shows the requested scopes — **Read** (`xizor:read`: apps, analytics, paywalls, subscribers, events) and **Write** (`xizor:write`: edit drafts, publish paywalls, manage placements and localizations). Grant read-only if you prefer.
4. The client receives scoped tokens; you can revoke the connection anytime from your Xizor account.
That's OAuth 2.1 with PKCE and dynamic client registration — every mainstream MCP client handles it automatically.
## Connect: Claude.ai
1. Open **Settings → Connectors → Add custom connector**.
2. Paste `https://mcp.xizor.dev/mcp`.
3. Sign in with your Xizor account when prompted and choose your scopes.
Works on web and in the Claude desktop/mobile apps; the connector is then available in every chat (enable it via the tools menu).
## Connect: Claude Code
```sh
claude mcp add --transport http xizor https://mcp.xizor.dev/mcp
```
Then run `/mcp` inside Claude Code to complete the OAuth sign-in in your browser. Done — `claude "what's my MRR?"` now works.
## Connect: ChatGPT
1. Enable **Developer Mode**: Settings → Apps & Connectors → Advanced settings → Developer mode.
2. Go to **Settings → Connectors → Add connector** (Create in Developer Mode).
3. Set the server URL to `https://mcp.xizor.dev/mcp`, authentication: OAuth.
4. Complete the sign-in flow.
## Connect: Gemini CLI
```sh
gemini mcp add --transport http xizor https://mcp.xizor.dev/mcp
```
Or add it manually to `~/.gemini/settings.json`:
```json
{
"mcpServers": {
"xizor": {
"httpUrl": "https://mcp.xizor.dev/mcp"
}
}
}
```
The CLI opens the browser for OAuth on first use (`/mcp auth xizor` if you need to re-trigger it).
## Example prompts
Analytics:
- "What's my MRR trend over the last 90 days, and which product drives it?"
- "Compare trial conversion this month vs. last month. Any country standing out?"
- "Which paywall version converts best on the onboarding placement?"
Paywall work (write scope):
- "Translate my onboarding paywall to Japanese and publish it."
- "Create a winter-sale paywall from the cinematic template with 40% off messaging, assign it to the `promo` placement, but don't publish yet — show me the draft first."
- "The CTA on the upsell paywall says 'Subscribe'. Change it to 'Start my free week' in all locales and publish."
Combined:
- "Look at the funnel for the paywall on `settings`. If the start rate is under 5%, rewrite the headline to focus on the free trial and publish a new version."
Agents always operate on drafts first and need an explicit publish — you can also just keep write scope off and use Xizor MCP as a pure analytics companion.
## Tips
- `get_paywall_schema_docs` gives the agent the full [document schema](https://xizor.dev/docs/paywalls) so it writes valid paywalls on the first try; `validate_paywall_document` lets it check before publishing.
- Coding agent integrating Xizor into an app? Point it at [For coding agents](https://xizor.dev/docs/for-agents) and [/llms-full.txt](https://xizor.dev/llms-full.txt).
---
# REST API
URL: https://xizor.dev/docs/api
Most apps never call this API directly — the [iOS](https://xizor.dev/docs/quickstart-ios) and [Expo](https://xizor.dev/docs/quickstart-expo) SDKs cover the client surface. Call it yourself for server-to-server entitlement checks (with a secret key, `xz_sec_…`) and to receive [webhooks](#customer-webhooks). This page is generated from the canonical API contract in the Xizor repository at build time, so it cannot drift from the implementation.
The public Xizor API consumed by the SDKs (XizorKit, @xizor/expo), by the Apple
App Store (Server Notifications V2), and — for the entitlement/webhook surface —
by customer servers. Implemented as Next.js route handlers in `apps/api`.
- Base URL: `https://api.xizor.dev`
- All request and response bodies are JSON, all field names are `snake_case`.
- Timestamps are ISO 8601 strings (e.g. `2026-07-13T09:30:00Z`).
- CORS is not enabled — these endpoints are for native apps and servers, not
browsers. `OPTIONS` requests are answered with `204` and an `Allow` header.
## Authentication
All SDK endpoints require an API key:
```
Authorization: Bearer xz_pub_XXXXXXXXXXXXXXXXXXXXXXXXXXXXXXXX
```
### Key kinds and the subscriber-identity rule
- **Publishable key** (`xz_pub_…`) — safe to embed in client apps. It may
address a subscriber **only by the server-issued `app_account_token`** (an
unguessable UUID from `/v1/identify`). It **cannot** read/attribute by a
developer-chosen `app_user_id`. This is deliberate: the publishable key ships
in every binary, so allowing lookups by a guessable id would let anyone
enumerate the paying-subscriber base. `identify` under a publishable key is
anonymous (send a known `app_account_token` to re-attach, or nothing for a
fresh one).
- **Secret key** (`xz_sec_…`) — server-to-server only, never shipped. It may use
a custom `app_user_id` for reads/attribution and to bind a stable
cross-device identity. Associating a logged-in user to a subscriber is a
backend (secret-key) operation.
So: `GET /v1/entitlements` and `POST /v1/events` accept a **UUID
`app_account_token`** under a publishable key — pass the token (the UUID from
`/v1/identify`) **as the `app_user_id` parameter/field**; a non-UUID value
returns `403 forbidden`. A custom `app_user_id` requires a secret key, and
binding one to a subscriber is done via `POST /v1/subscribers/alias`.
Secret keys (`xz_sec_…`, server-side only) are also accepted on the same
endpoints. Keys are looked up by SHA-256 hash; a revoked or unknown key yields
`401 unauthorized`.
The Apple notification endpoint (`/v1/apple/notifications/{app_id}`) uses **no
API key** — authenticity comes from the JWS signature, which is verified
against the pinned Apple root certificates and the app's registered bundle id.
## Error format
Every error is:
```json
{ "error": { "code": "invalid_request", "message": "Human-readable detail." } }
```
Stack traces are never leaked; unexpected failures return an opaque
`internal_error`.
| HTTP | `code` | Meaning |
| ---- | ---------------------------------------------------------------------------- | ------------------------------------------------------------------------------------- |
| 400 | `invalid_request` | Malformed JSON, failed schema validation, missing query parameter |
| 400 | `invalid_notification` | Notification payload missing required fields (e.g. `notificationUUID`) |
| 401 | `unauthorized` | Missing/invalid/revoked API key |
| 401 | `invalid_transaction` | JWS signature/chain verification failed for a transaction |
| 401 | `invalid_notification` | JWS verification failed for a notification |
| 403 | `bundle_id_mismatch` | The JWS bundle id does not match the app's registered `bundle_id` |
| 404 | `not_found` / `app_not_found` / `paywall_not_found` / `subscriber_not_found` | Resource missing |
| 404 | `apple_not_configured` | The app has no Apple IAP key (offer signatures need one) |
| 405 | `method_not_allowed` | Wrong HTTP method |
| 409 | `conflict` | Alias conflict: the `app_account_token` is already bound to a different `app_user_id` |
| 422 | `unsupported_environment` | JWS from Xcode/LocalTesting environment (only Production and Sandbox are accepted) |
| 422 | `invalid_transaction` | Verified payload missing required fields |
| 500 | `internal_error` | Unexpected server error |
---
## `POST /v1/identify`
Find or create the subscriber for this device/user. Call once at SDK start and
again after login. The returned `app_account_token` (UUID) must be passed to
StoreKit as `appAccountToken` on every purchase — it is what ties App Store
transactions back to the subscriber.
Lookup order: `app_account_token` → (`app_id`, `app_user_id`) → create. An
anonymous subscriber is later merged with an `app_user_id` on the first
identified call carrying its token.
### Request
```json
{
"app_user_id": "user_42",
"app_account_token": "6f8a2f0e-4f6e-4b1a-9f5e-1c2d3e4f5a6b",
"platform": "ios",
"sdk_version": "0.1.0"
}
```
| Field | Type | Required | Notes |
| ------------------- | ------ | -------- | ---------------------------------------------------------- |
| `app_user_id` | string | no | Customer-assigned user id. Omit for anonymous subscribers. |
| `app_account_token` | uuid | no | Token from a previous identify (re-install / re-login). |
| `platform` | string | yes | e.g. `ios` |
| `sdk_version` | string | yes | e.g. `0.1.0` |
### Response `200`
```json
{
"app_user_id": "user_42",
"app_account_token": "6f8a2f0e-4f6e-4b1a-9f5e-1c2d3e4f5a6b",
"entitlements": []
}
```
For anonymous subscribers `app_user_id` equals the `app_account_token`, so the
field is always a stable, non-null identifier.
---
## `POST /v1/transactions`
Server-side verification of a StoreKit 2 signed transaction
(`VerificationResult.jwsRepresentation`). The JWS x5c chain is verified against
the pinned Apple root CAs (with online revocation checks); the environment
(Production/Sandbox) is taken from the payload itself, and the payload's
`bundleId` must match the app's registered bundle id. On success the
transaction is upserted (idempotent by `transaction_id`), product metadata is
learned, and the subscription state is updated.
### Request
```json
{
"signed_transaction": "eyJhbGciOiJFUzI1NiIsIng1YyI6Wy4uLl19...",
"app_user_id": "user_42"
}
```
### Response `200`
```json
{
"entitlements": [
{
"identifier": "pro",
"is_active": true,
"product_id": "com.example.pro.yearly",
"expires_at": "2027-07-13T09:30:00.000Z",
"will_renew": true,
"is_trial": false,
"state": "subscribed"
}
]
}
```
`state` is one of `subscribed`, `expired`, `in_grace_period`,
`in_billing_retry`, `revoked`, `paused`. Only `subscribed` and
`in_grace_period` entitle the user. `is_trial` is derived from the offer type
of the underlying subscription (introductory offer).
Notes:
- Transactions from the `Xcode` or `LocalTesting` environment are rejected
with `422 unsupported_environment` (they are signed with local certificates
and cannot pass Apple's chain).
- If the payload carries an `appAccountToken`, subscriber attribution prefers
it over `app_user_id` (it is cryptographically bound to the purchase).
---
## `GET /v1/entitlements?app_user_id=…`
Current computed entitlements of a subscriber. `app_user_id` also accepts an
`app_account_token` (how anonymous subscribers are addressed).
### Response `200`
```json
{
"entitlements": [
{
"identifier": "pro",
"is_active": true,
"product_id": "com.example.pro.yearly",
"expires_at": "2027-07-13T09:30:00.000Z",
"will_renew": true,
"is_trial": false,
"state": "subscribed"
}
]
}
```
`404 subscriber_not_found` if the id is unknown.
---
## `GET /v1/paywall?placement=…&locale=…&context=…`
The published paywall document for a placement. App code references
**placements**, never paywalls directly; the dashboard decides which paywall a
placement shows. `locale` is optional — documents carry all locales, the
renderer picks.
### `context` (optional) — placement rules
`context` is a URL-encoded JSON object (`string | number | boolean` values,
max 20 keys, 1 KB — otherwise `400 invalid_request`) describing the
presentation, e.g. `{"source":"onboarding","wasReferred":true}`. When the
placement has **rules** (dashboard → Placements → Rules, or the MCP tool
`set_placement_rules`), they are evaluated top to bottom against this context —
`eq`, `neq` (also matches when the param is absent), `in`, `exists` — and the
first match decides which paywall is served. No match, no rules, malformed
rules, or a rule paywall without a published version → the placement's
assigned paywall (a hard gate never comes up empty). The context is also
available to the renderer as `{{context.}}` variables.
Without `context`, rules are skipped entirely (hot path).
### Caching ("save → live")
- Response carries `ETag: ""` and `Cache-Control: no-cache`.
- Clients revalidate with `If-None-Match` on **every** presentation; the server
answers `304 Not Modified` (empty body, same `ETag`) when unchanged.
- A publish in the dashboard changes the version id, so the very next
presentation fetches the new document — no app update needed.
- With `context`, the ETag still is the version id of whichever paywall the
rules selected — it varies naturally with the outcome, so SDK caches must key
on placement + locale + (sorted) context.
### Response `200`
```json
{
"paywall_id": "0b9cf480-8f2f-4d55-a2b7-0a3f9f6f2f11",
"paywall_identifier": "summer-sale",
"version": 4,
"placement": "onboarding",
"document": { "schemaVersion": 1, "root": { "type": "stack" } },
"products": [
{
"slot": "yearly",
"store_product_id": "com.example.pro.yearly",
"offer_id": "referral_yearly"
},
{ "slot": "monthly", "store_product_id": "com.example.pro.monthly" }
]
}
```
`document` is the full paywall document (`@xizor/paywall-schema`); `products`
is the slot → App Store product id mapping extracted from it, so SDKs can
prefetch StoreKit products before rendering. `offer_id` (only present when the
slot configures one) is the promotional offer the SDK signs via
`POST /v1/offers/signature` before purchasing.
`404 paywall_not_found` when the placement is missing, inactive, has no
paywall assigned, or the paywall was never published.
---
## `POST /v1/subscribers/alias`
**Secret key only** (`403 forbidden` otherwise) — server-to-server, typically
right after your user logs in. Binds a developer-chosen `app_user_id` to the
subscriber holding `app_account_token` (the UUID your app got from the SDK —
`Xizor.shared.appAccountToken` / `client.getAppAccountToken()`).
### Request
```json
{
"app_account_token": "8f14e45f-ceea-4671-9f5e-1c2d3e4f5a6b",
"app_user_id": "user_42"
}
```
### Semantics
- **Idempotent**: aliasing to the id the token is already bound to → `result: "noop"`.
- **First bind** → `result: "set"`.
- **Merge**: if `app_user_id` already belongs to a _different_ subscriber
(e.g. the user reinstalled and got a fresh anonymous token), that
subscriber's transactions, subscription states, events and attributes are
merged into the token subscriber atomically and the duplicate is deleted →
`result: "merged"`. The token subscriber always wins — the SDK holds the
token and it is embedded in future signed transactions.
- `409 conflict` when the token is already bound to a **different**
`app_user_id` (re-aliasing is not allowed; log the user out server-side and
identify fresh instead).
- `404 subscriber_not_found` for an unknown token.
### Response `200`
```json
{
"result": "merged",
"app_user_id": "user_42",
"app_account_token": "8f14e45f-ceea-4671-9f5e-1c2d3e4f5a6b",
"entitlements": [{ "identifier": "pro", "is_active": true, "…": "…" }]
}
```
---
## `POST /v1/subscribers/import`
**Secret key only** (`403 forbidden` otherwise) — bulk provider-migration
import, called from your backend when cutting over from another subscription
provider. For each `original_transaction_id` the current subscription state is
fetched from the App Store Server API, every signed transaction is
JWS-verified through the same pinned-chain path as device syncs, and
subscribers, transactions, and subscription states are seeded — entitlements
are live before any device ships the new SDK.
### Request
```json
{
"subscribers": [
{
"original_transaction_id": "2000000123456789",
"app_account_token": "8f14e45f-ceea-4671-9f5e-1c2d3e4f5a6b",
"app_user_id": "user_42"
}
]
}
```
- `subscribers`: 1–50 items per request — page through your subscriber base in
batches (items are processed sequentially against App Store Server API rate
limits).
- `app_account_token` (optional): seeds the subscriber token when the purchase
JWS carries none.
- `app_user_id` (optional): developer user id to bind after import (alias
semantics).
### Response `200`
```json
{
"imported": 1,
"not_found": 0,
"errors": 0,
"results": [
{ "original_transaction_id": "2000000123456789", "result": "imported" }
]
}
```
---
## `POST /v1/offers/signature`
ES256 signature for an App Store Connect **promotional offer** — publishable
or secret key (the signature only lets the current subscriber redeem a
developer-created discount; it grants no data access). Stateless, nothing is
written. The SDKs call this automatically when a paywall product slot has an
`offerId`.
### Request
```json
{
"store_product_id": "com.example.pro.yearly",
"offer_id": "referral_yearly",
"app_account_token": "8f14e45f-ceea-4671-9f5e-1c2d3e4f5a6b"
}
```
### Response `200`
```json
{
"key_id": "2X9R4HXF34",
"nonce": "f8f14e45-ceea-4671-9f5e-1c2d3e4f5a6b",
"timestamp": 1789300200000,
"signature": "MEUCIQ…(base64)"
}
```
Maps 1:1 onto StoreKit's
`Product.PurchaseOption.promotionalOffer(offerID:keyID:nonce:signature:timestamp:)`
(and expo-iap's `withOffer`). Apple honors the signature for 24 h from
`timestamp`. `404 apple_not_configured` until the app has an IAP key id + .p8
configured (dashboard → App settings → Apple).
---
## `POST /v1/events`
Batch event ingestion (1–500 events per request). Feeds all paywall funnel and
analytics stats.
### Request
```json
{
"events": [
{
"name": "paywall_view",
"app_user_id": "user_42",
"placement_id": "b57a2f0e-4f6e-4b1a-9f5e-1c2d3e4f5a6b",
"paywall_id": "0b9cf480-8f2f-4d55-a2b7-0a3f9f6f2f11",
"paywall_version": 4,
"properties": { "source": "onboarding" },
"client_ts": "2026-07-13T09:30:00Z"
}
]
}
```
| Field | Type | Required |
| ----------------- | ------------- | --------------------------------- |
| `name` | string (≤120) | yes |
| `app_user_id` | string | yes (accepts `app_account_token`) |
| `placement_id` | uuid | no |
| `paywall_id` | uuid | no |
| `paywall_version` | int | no |
| `properties` | object | no |
| `client_ts` | ISO 8601 | yes |
Well-known names: `paywall_view`, `paywall_dismiss`, `purchase_started`,
`purchase_completed`, `purchase_failed`, `restore`; anything else is treated as
a custom event. Events with an unknown `app_user_id` are stored without a
subscriber link — they never fail the batch.
### Response `200`
```json
{ "accepted": 1 }
```
---
## `POST /v1/products`
Store-catalog metadata sync — the SDKs report product metadata they learn from
StoreKit (billing period, type, subscription group, display-price variables).
The nominal product period is what lets analytics normalize MRR (sandbox
transaction durations are compressed). Publishable keys are allowed: the data
is already public in the App Store, and verified prices are never touched
here — the `variables` are stored for the paywall editor preview only.
### Request
```json
{
"products": [
{
"store_product_id": "com.example.pro.yearly",
"type": "auto_renewable",
"period": "P1Y",
"subscription_group_id": "21341234",
"variables": { "price": "$39.99", "pricePerMonth": "$3.33" },
"storefront": "USA"
}
]
}
```
- `products`: 1–100 items. `type` is one of `auto_renewable`, `consumable`,
`non_consumable`, `non_renewing`; `period` is an ISO-8601 billing cycle
(`P1W`, `P1M`, `P1Y`, …), null for non-subscriptions.
### Response `200`
```json
{ "synced": 1 }
```
---
## `POST /v1/apple/notifications/{app_id}`
App Store Server Notifications V2 receiver. Configure in App Store Connect
(App Information → App Store Server Notifications, both Production and
Sandbox):
```
https://api.xizor.dev/v1/apple/notifications/
```
`` is the app's Xizor id (UUID, shown in the dashboard).
### Request (sent by Apple)
```json
{ "signedPayload": "eyJhbGciOiJFUzI1NiIs..." }
```
### Processing
1. JWS verification against the pinned Apple root CAs; the bundle id inside the
payload must match the app's registered bundle id.
2. Idempotent insert into `store_notifications` keyed by `notificationUUID` —
Apple retries are acknowledged with `200` without reprocessing.
3. The inner `signedTransactionInfo` is verified and upserted into
`transactions` (renewals, refunds, revocations keep revenue data current).
4. The notification state machine updates `subscription_states`
(all 23 V2 notification types are mapped).
5. The event is fanned out to the app's webhook endpoints (see below).
### Response
`200 {"ok": true}` on success (`{"ok": true, "duplicate": true}` for retries of
already-processed notifications). Any non-2xx tells Apple to retry later.
---
## `GET /v1/health`
Unauthenticated liveness probe.
```json
{ "ok": true, "version": "0.1.0" }
```
---
## Customer webhooks
When an Apple notification is processed, Xizor delivers an event to every
webhook endpoint configured for the app (dashboard → App → Webhooks). An
endpoint with an empty event-type filter receives all events.
### Event names
`apple.`, e.g. `apple.subscribed`,
`apple.did_renew`, `apple.expired`, `apple.refund`,
`apple.did_change_renewal_status`.
**`apple.notification.raw`** — the verbatim Apple JWS (`signed_payload`) plus
routing metadata, for customers who keep their own notification pipeline (e.g.
mid-migration from another provider: point App Store Connect at Xizor, keep
your old consumer fed). **Opt-in only**: an endpoint receives it only when the
event type is listed explicitly in its filter — catch-all endpoints (empty
filter) never get it.
```json
{
"data": {
"notification_uuid": "002e14d5-51f5-4503-b5a8-c3a1af68eb20",
"notification_type": "DID_RENEW",
"subtype": null,
"environment": "Production",
"signed_payload": "eyJhbGciOiJFUzI1NiIsIng1YyI6…"
}
}
```
### Delivery
`POST` to your endpoint URL:
```
Content-Type: application/json
X-Xizor-Event: apple.did_renew
X-Xizor-Delivery-Id: 6d1a… (unique per delivery; use for idempotency)
X-Xizor-Signature: t=1789300200,v1=5257a869e7…
```
```json
{
"id": "6d1a2f0e-4f6e-4b1a-9f5e-1c2d3e4f5a6b",
"event": "apple.did_renew",
"created_at": "2026-07-13T09:30:00.000Z",
"data": {
"notification_uuid": "002e14d5-51f5-4503-b5a8-c3a1af68eb20",
"notification_type": "DID_RENEW",
"subtype": null,
"environment": "Production",
"app_id": "e2a3…",
"bundle_id": "com.example.app",
"original_transaction_id": "2000000123456789",
"product_id": "com.example.pro.yearly",
"state": "subscribed",
"expires_at": "2027-07-13T09:30:00.000Z",
"app_user_id": "user_42",
"signed_date": "2026-07-13T09:29:58.000Z"
}
}
```
Respond with any `2xx` within 10 seconds. Failed deliveries are retried on a
backoff schedule (1 min, 5 min, 30 min, 2 h, 12 h; 6 attempts total). Retries
are drained by a background worker (`GET /internal/webhooks/retry`, Vercel
Cron every 5 minutes, authenticated via `CRON_SECRET`), so a delivery whose
first attempt failed is re-attempted even if no further traffic arrives.
### Refund protection (CONSUMPTION_REQUEST)
When **refund protection** is enabled for an app (dashboard → App settings →
Apple) and Apple sends a `CONSUMPTION_REQUEST` notification (a customer asked
for a refund), Xizor automatically answers within Apple's ~12 h window via the
App Store Server API (`sendConsumptionInformation`): elapsed share of the
current subscription period as `consumptionPercentage`, `deliveryStatus:
DELIVERED`, `sampleContentProvided` from the subscription's intro-offer
history, and `refundPreference: DECLINE` once ≥ 80 % of the period is
consumed. Requires the app's Apple issuer id, key id and .p8. **Enable only if
your app collects the customer's consent to share consumption data with Apple
(`customerConsented`).** The `apple.consumption_request` webhook event is
dispatched either way.
### Verifying the signature
Each endpoint has a secret (`whsec_…`, shown once at creation, rotatable). The
`X-Xizor-Signature` header is `t=,v1=` where:
```
v1 = HMAC_SHA256(secret, "." + )
```
Verification (Node.js):
```js
import { createHmac, timingSafeEqual } from "node:crypto";
function verifyXizorSignature(
rawBody,
signatureHeader,
secret,
toleranceSeconds = 300,
) {
const parts = Object.fromEntries(
signatureHeader.split(",").map((p) => p.split("=")),
);
const t = Number(parts.t);
if (!Number.isFinite(t) || Math.abs(Date.now() / 1000 - t) > toleranceSeconds)
return false;
const expected = createHmac("sha256", secret)
.update(`${t}.${rawBody}`)
.digest("hex");
const given = Buffer.from(parts.v1 ?? "", "hex");
return (
given.length === expected.length / 2 &&
timingSafeEqual(Buffer.from(expected, "hex"), given)
);
}
```
Always compute the HMAC over the **raw** body bytes (before any JSON parsing),
compare in constant time, and reject stale timestamps to prevent replays.
---
## Environment variables (`apps/api`)
| Variable | Purpose |
| --------------------------- | ---------------------------------------------------------------------------------------------- |
| `SUPABASE_URL` | Supabase project URL |
| `SUPABASE_SERVICE_ROLE_KEY` | service_role key (`createServiceClient` from `@xizor/db/server`) |
| `CRON_SECRET` | Bearer secret for `GET /internal/webhooks/retry` (Vercel Cron sends it automatically once set) |
Apple root certificates (`AppleRootCA-G3.cer`, `AppleRootCA-G2.cer`,
`AppleIncRootCertificate.cer`) live in `apps/api/certs/` and are bundled via
`outputFileTracingIncludes`; re-download from
https://www.apple.com/certificateauthority/ when Apple rotates roots.
---
# For coding agents
URL: https://xizor.dev/docs/for-agents
This page is written for **coding agents** (Claude Code, Cursor, Codex, Gemini CLI, …) and for the humans who direct them. If you're an agent reading this: welcome — everything you need is here and in [/llms-full.txt](https://xizor.dev/llms-full.txt), which contains the complete documentation (SDK APIs, REST reference, paywall schema) as one Markdown file.
## Copy-paste integration prompt
Give this to your agent, filling in the two placeholders:
```text
Integrate Xizor (https://xizor.dev — subscriptions, paywalls, analytics for
mobile apps) into this app. Read https://xizor.dev/llms-full.txt first for
the full SDK and API reference.
My publishable API key: xz_pub_REPLACE_ME
Entitlement to gate on: "pro"
1. Add the SDK.
- Native iOS (SwiftUI): add the XizorKit Swift package
(monorepo https://github.com/valewnrt/xizor, package path sdks/swift;
add as a local SPM package until the dedicated repo ships).
- Expo / React Native: `npx expo install expo-iap react-native-webview
expo-web-browser expo-secure-store expo-haptics` then add
`@xizor/expo`. Purchases need a development build, NOT Expo Go.
2. Configure at app start.
- Swift: `Xizor.configure(apiKey: "")` in App.init.
- Expo: wrap the root component in ``.
If the app has authentication, bind the install to the account after
login: send the SDK's appAccountToken (`await Xizor.shared.appAccountToken`
/ `await xizor.getAppAccountToken()`) to your backend and call
POST /v1/subscribers/alias there with the secret key.
3. Gate premium features on entitlements — never on local flags or
client-side receipt parsing. Xizor computes entitlements server-side.
- Swift: `Xizor.shared.hasEntitlement("pro")`, or observe
`Xizor.shared.currentEntitlements` (it's @Published).
- Expo: `const { isPro } = useEntitlements()`.
4. Present the paywall from a placement wherever the user hits a gate.
Use the placement id "onboarding" (create more placements in the
dashboard later — do not hardcode paywall designs in the app).
- Swift: `await Xizor.shared.presentPaywall(placement: "onboarding")`
or `XizorPaywallView(placement: "onboarding")` in a fullScreenCover.
- Expo: `const paywall = usePaywall("onboarding"); paywall.present()`.
Handle the result: unlock on .purchased/.restored, continue on
.dismissed.
5. Keep a restore path: a "Restore purchases" button in settings calling
`Xizor.shared.restorePurchases()` / `xizor.restore()` (paywalls
rendered by Xizor already include restore).
6. Optionally track key funnel moments with
`Xizor.shared.track("event_name")` / `xizor.trackEvent("event_name")`.
7. Do not add any other IAP library, StoreKit glue, or receipt
validation — Xizor owns the purchase path end to end.
Verify: the app builds; the gate shows the paywall for non-subscribers;
a sandbox purchase unlocks the entitlement (requires the Apple setup from
https://xizor.dev/docs/apple-setup to be completed).
```
## CLAUDE.md / AGENTS.md snippet
Add this to your repo's agent instructions file so every future session knows how subscriptions work in your codebase:
```markdown
## Subscriptions (Xizor)
This app uses Xizor (https://xizor.dev) for subscriptions, paywalls, and
analytics. Full docs: https://xizor.dev/llms-full.txt
- SDK is configured at app start with the publishable key (xz_pub_…,
safe to embed). Do not add other IAP/receipt code.
- Feature gating: check the "pro" entitlement via the SDK
(`hasEntitlement("pro")` in Swift, `useEntitlements()` in Expo) —
entitlements are computed server-side; never trust local state.
- Paywalls are server-hosted and fetched by placement id. To change
paywall content/design, edit it in the Xizor dashboard or via the
Xizor MCP server — NOT in app code. App code only chooses when to
present which placement.
- Purchases must go through the SDK (`purchase` / paywall renderer) so
the appAccountToken is attached and the transaction is verified
server-side.
- Testing purchases requires a sandbox tester and a development build
(no Expo Go): https://xizor.dev/docs/apple-setup
- The one-time Apple setup (IAP key, notification URLs, sandbox
testers) is browser work in App Store Connect. An agent whose session
has connected browser-automation tools can do it end-to-end; without
such tools it is a manual step for the developer — don't suggest
enabling tools for it.
```
## Give your agent live access (MCP)
The prompt above covers _integrating the SDK_. For everything after — reading revenue, editing and publishing paywalls, localizing — connect the agent to the Xizor MCP server:
```sh
claude mcp add --transport http xizor https://mcp.xizor.dev/mcp
```
OAuth sign-in happens in the browser; no keys end up in your repo. See the [MCP guide](https://xizor.dev/docs/mcp) for Claude.ai, ChatGPT, and Gemini CLI setup plus the full list of 29 tools.
A useful division of labor:
- **Coding agent + SDK docs** → wires purchases, gates, and placements into the codebase (one-time).
- **Any agent + MCP** → operates the business continuously: watches funnels, iterates paywall copy, ships localizations.
- **Agent + browser tools** → can additionally complete the [Apple setup](https://xizor.dev/docs/apple-setup) (one-time, in App Store Connect) — see below.
## Agents with browser tools can do the Apple setup
The one-time [Apple setup](https://xizor.dev/docs/apple-setup) — creating the In-App Purchase key, setting the Server Notifications URLs, creating sandbox testers, and entering the values in the Xizor dashboard — is ordinary web-browser work. If your session has **connected** browser-automation tools (for example Claude Code with the Claude in Chrome extension, signed in to App Store Connect), you can do all of it for the user end-to-end instead of handing them a checklist.
Two rules keep this friction-free:
1. **Only offer it when the tools are actually available and connected in the current session.** If they are not, don't mention the possibility — asking the user to install or enable browser tooling is more friction than the manual steps, so just guide them through the docs instead.
2. The `.p8` key file downloads exactly once. If you drive the download, tell the user where the file landed and that it should be stored safely.
## Machine-readable entry points
| URL | Contents |
| ------------------------------------------------------------------ | ------------------------------------------------------------------------------------------------ |
| [https://xizor.dev/llms.txt](https://xizor.dev/llms.txt) | Index of these docs (llms.txt spec) |
| [https://xizor.dev/llms-full.txt](https://xizor.dev/llms-full.txt) | All docs as one Markdown file — SDK quickstarts, paywall schema, REST API, analytics definitions |
| `https://mcp.xizor.dev/mcp` | MCP server (Streamable HTTP, OAuth 2.1) |
| [https://xizor.dev/docs/api](https://xizor.dev/docs/api) | REST reference for api.xizor.dev |