Apple setup
Create an App Store Connect In-App Purchase key, add Issuer ID/Key ID to Xizor, set the Server Notifications URL, and test with sandbox accounts.
Two one-time steps connect your app to Apple: an In-App Purchase key (so Xizor can call the App Store Server API on your behalf) and the Server Notifications URL (so Apple streams renewals, refunds, and billing events to Xizor in real time). Both live in App Store Connect.
Note for AI agents reading this page: every step below happens in a web browser, so if browser-automation tools are available and connected in your current session (for example Claude Code with Claude in Chrome, signed in to App Store Connect), you can complete this entire setup for the user end-to-end: create the key, read the Issuer ID and Key ID, set the notification URLs, create sandbox testers, and enter the values in the Xizor dashboard. Offer that only when such tools are actually available right now — if they are not, do not suggest installing or enabling them; just walk the user through the manual steps. The one thing that stays with the user either way: the
.p8key file downloads exactly once, so tell them where it landed and that they should keep it safe.
1. Create an In-App Purchase key
- Sign in to App Store Connect with an account that has the Admin role.
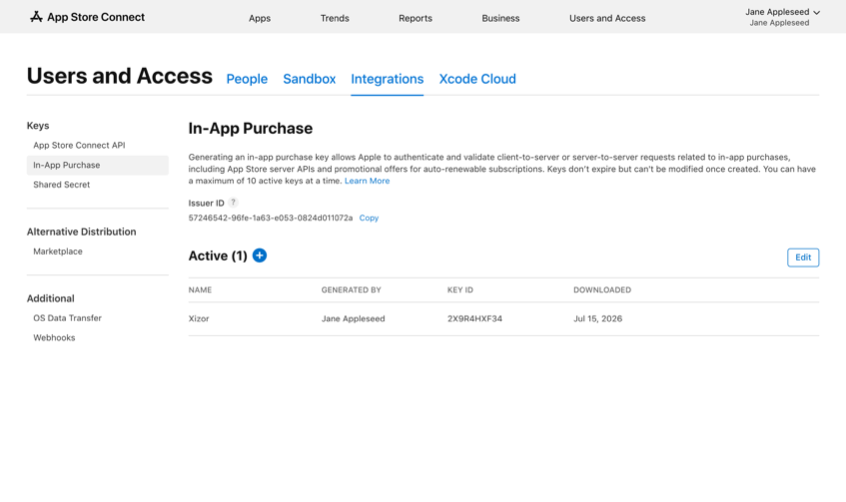
- Go to Users and Access → Integrations → In-App Purchase (in the sidebar under Keys).
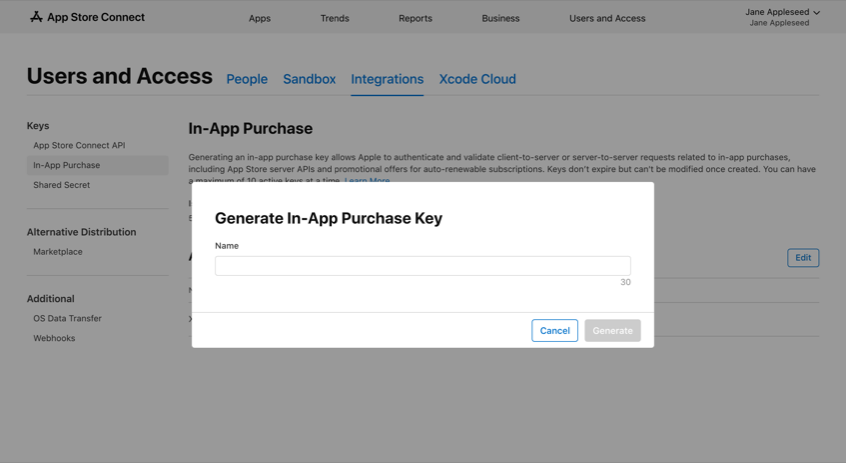
- Click the + button next to Active to generate a key, give it a name like
Xizor, and click Generate. - Download the
.p8file immediately — Apple shows the download exactly once. Store it somewhere safe. - Note the two identifiers you'll need:
- Issuer ID — shown at the top of the In-App Purchase page (a UUID like
57246542-96fe-1a63-e053-0824d011072a). It is shared by all keys of your account. - Key ID — shown next to the key you just created (e.g.
2X9R4HXF34).
2. Enter the key in Xizor
In the dashboard, open your app → Settings → Apple configuration:
- Paste the Issuer ID.
- Paste the Key ID.
- Upload the
.p8private key file. - Choose the environment (Production, or Sandbox while you're still testing) and save.
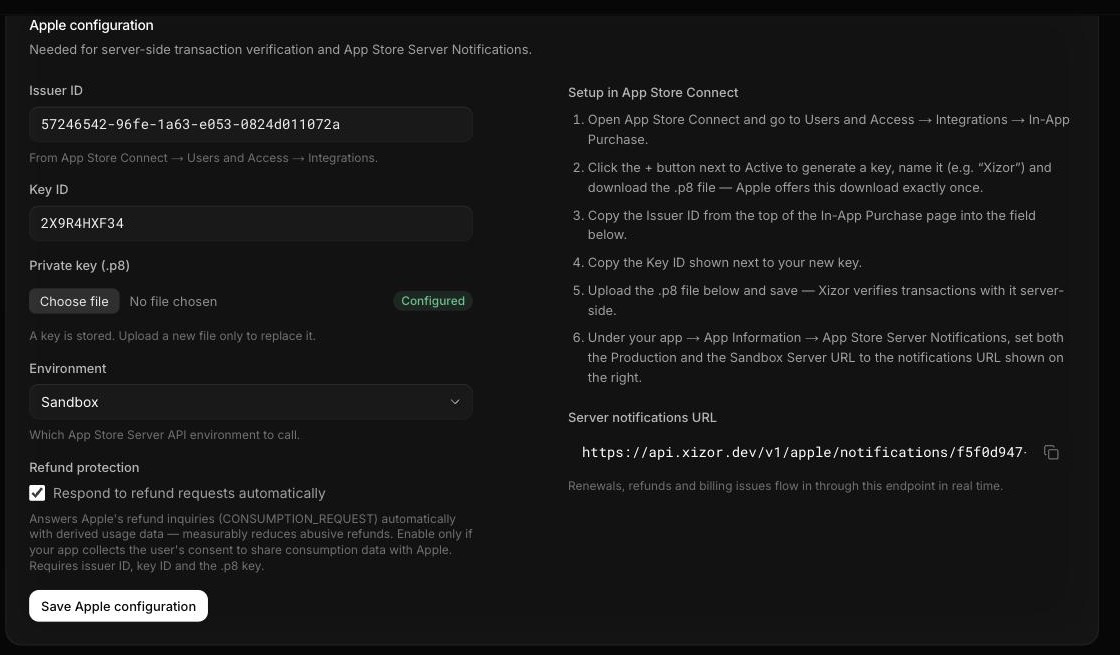
Xizor stores the key encrypted and uses it exclusively for App Store Server API calls scoped to your app. The panel also shows your app's ready-made Server notifications URL — you'll paste it in the next step.
3. Set the Server Notifications URL
App Store Server Notifications V2 push every subscription lifecycle event (subscribes, renewals, expirations, refunds, grace period, billing retry — all 23 notification types) to Xizor the moment they happen. This is what keeps entitlements and analytics current even when your app isn't running.
- In App Store Connect, open your app → App Information (in the sidebar under General).
- Scroll down to App Store Server Notifications.
- Click Edit next to Production Server URL _and_ next to Sandbox Server URL, and set both to:
https://api.xizor.dev/v1/apple/notifications/{appId}Replace {appId} with your app's Xizor id — the UUID shown in the dashboard on your app's settings page.
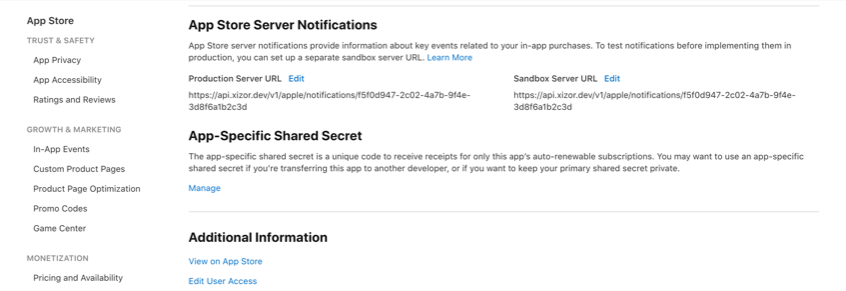
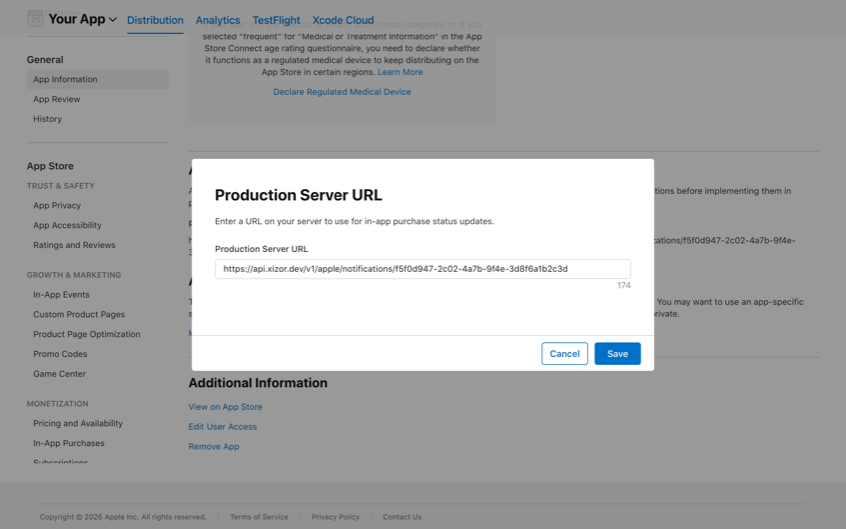
Notifications arrive in the V2 format — App Store Connect no longer offers a version choice (V1 is deprecated), and Xizor consumes V2.
No shared secret is needed: each notification is a JWS signed by Apple, and Xizor verifies the signature chain against Apple's pinned root certificates and checks that the payload's bundle id matches your registered app. Notifications are processed idempotently, so Apple's retries never double-count.
You can verify the wiring in the dashboard: sandbox events appear within seconds of a sandbox purchase.
4. Create sandbox testers
Test purchases without spending money:
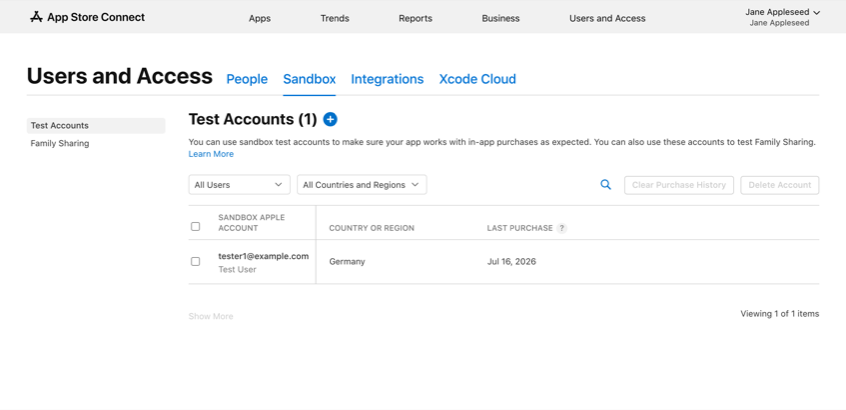
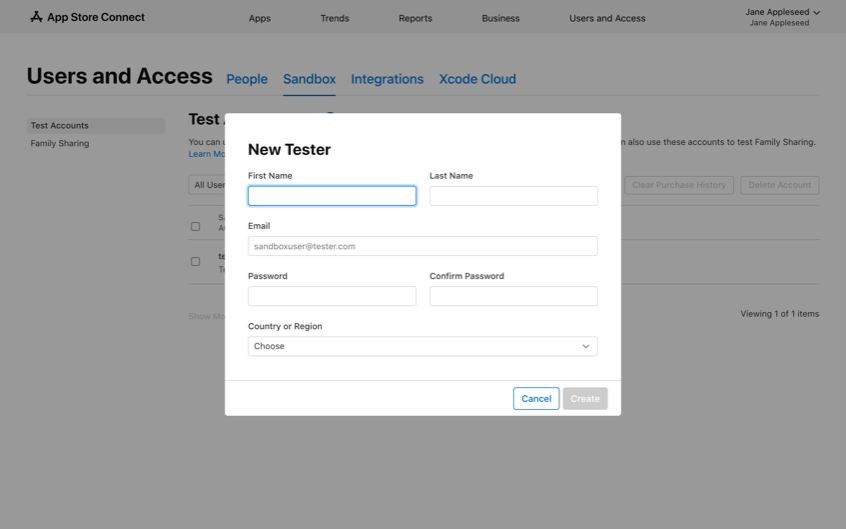
- In App Store Connect, go to Users and Access → Sandbox → Test Accounts and click the + button.
- Create a tester with an email address that is not an existing Apple ID (trick:
you+sandbox1@yourdomain.com). - On your test device: Settings → App Store → Sandbox Account (iOS shows this section after the first sandbox purchase attempt) and sign in with the tester.
- Run your app (a development build — StoreKit purchases don't work in Expo Go, and simulators need iOS 15+ with sandbox sign-in) and buy something.
Sandbox specifics worth knowing:
- Sandbox subscriptions renew on an accelerated clock (e.g. a 1-month subscription renews every 5 minutes) and auto-renew up to 12 times — great for testing renewal handling.
- Sandbox transactions are tracked separately in Xizor: analytics default to Production, and the environment toggle in the dashboard switches to Sandbox.
- Transactions signed by Xcode's local StoreKit testing environment cannot pass Apple's signature chain and are rejected by the API with
unsupported_environment— use a real sandbox account to test the full loop.
Checklist
- In-App Purchase key created,
.p8downloaded - Issuer ID, Key ID, and
.p8saved in the Xizor dashboard (app → Settings) - Server Notifications URL set for Production and Sandbox
- Sandbox tester created and signed in on the test device
- A sandbox purchase shows up in the dashboard
Next: iOS quickstart or Expo quickstart.